Create a Typographic Portrait in Photoshop

Create a Typographic Portrait in Photoshop

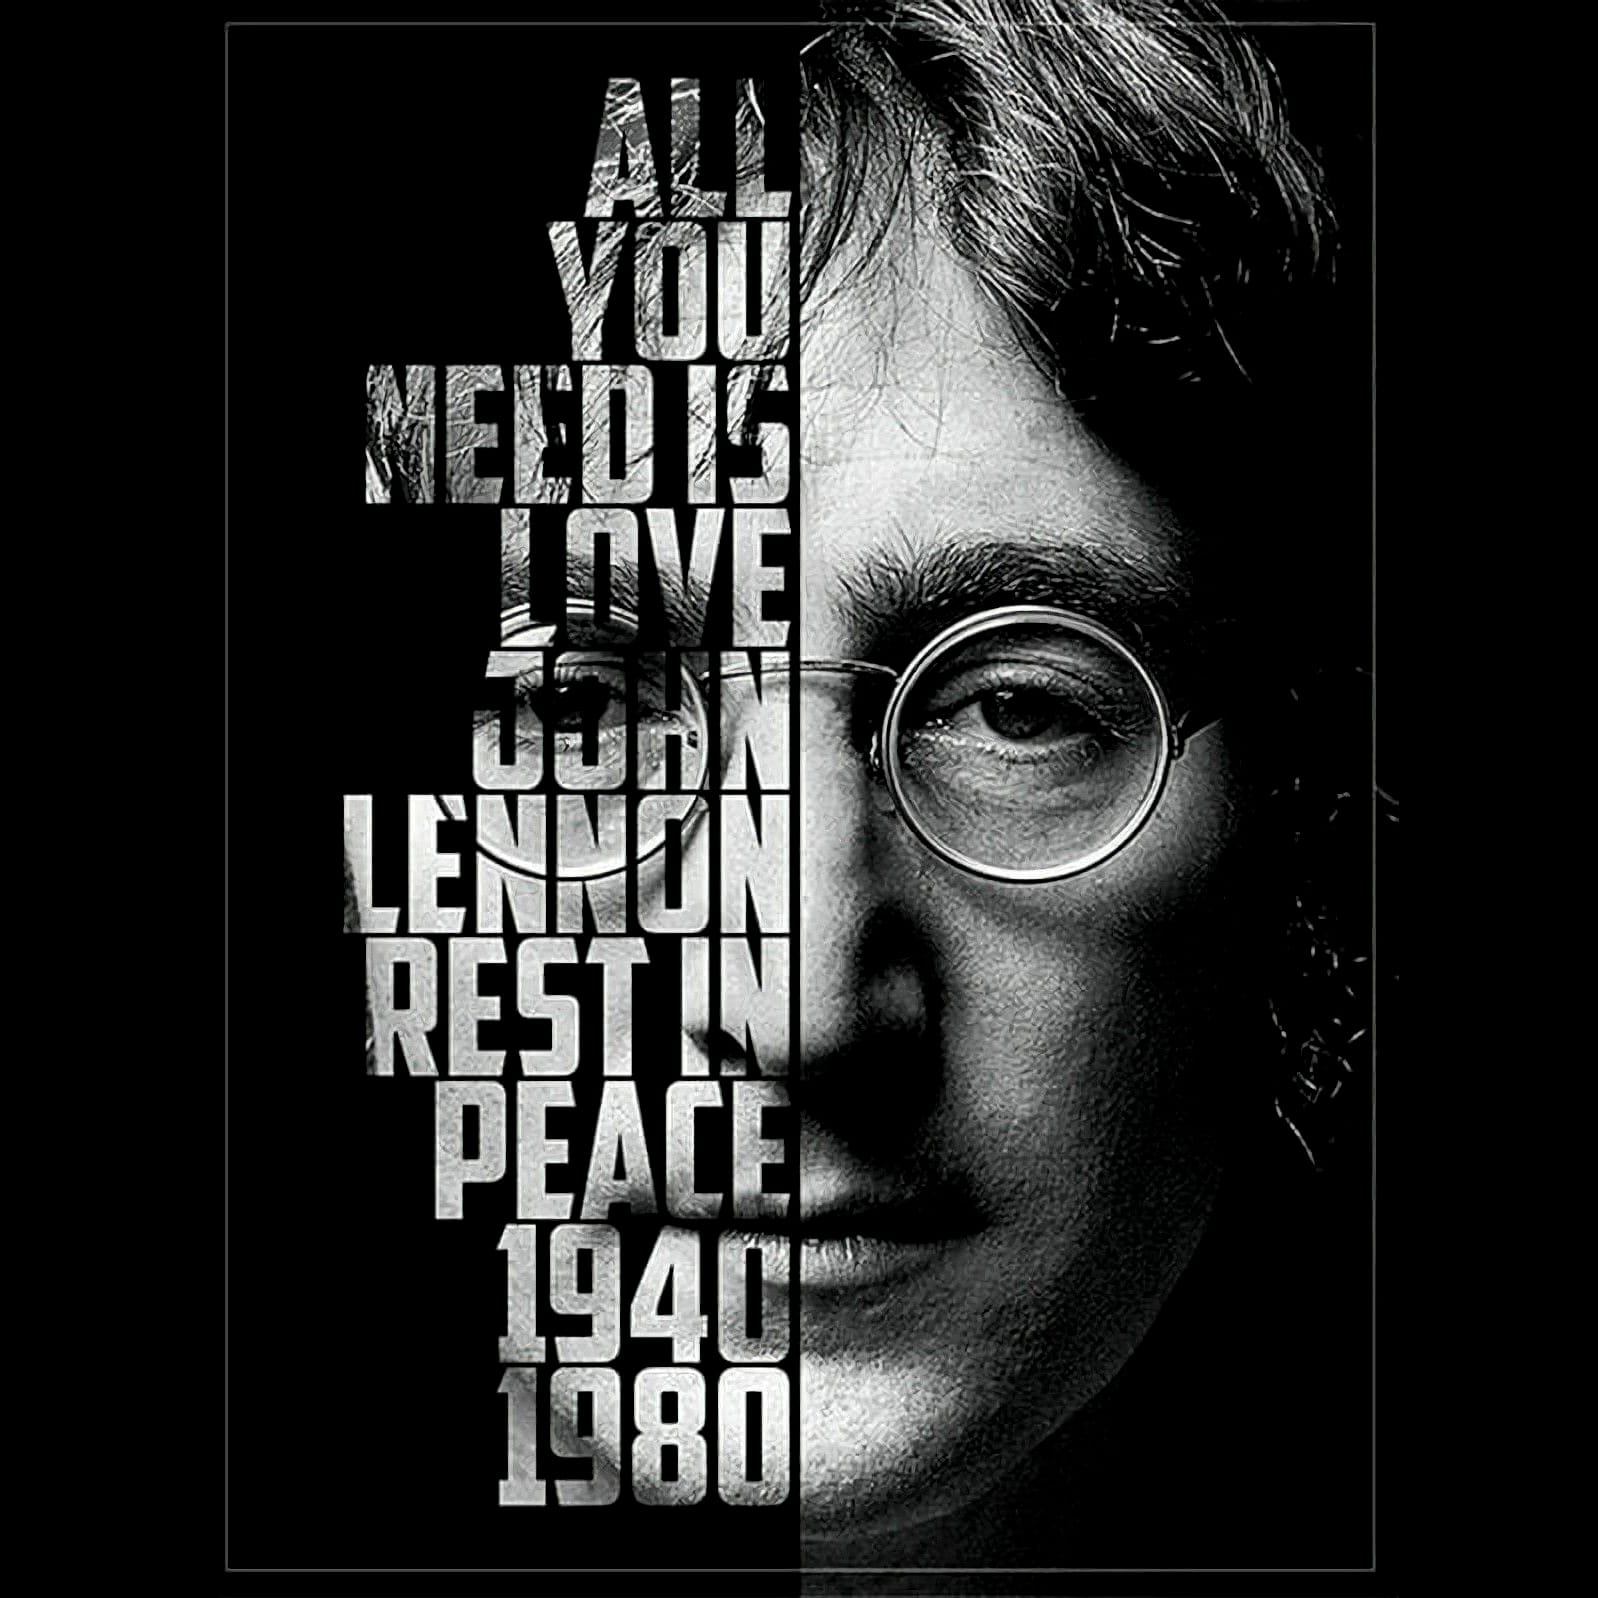
This tutorial explores a creative method for transforming a standard photographic portrait into a unique work of art composed entirely of text. It demonstrates how to combine typography with image manipulation to create a visually compelling and personalized artistic statement.

Viewers will learn how to prepare an image, generate and integrate custom text, and apply advanced Photoshop techniques like displacement mapping to achieve a stunning, text-based artwork that subtly conforms to the contours of a face.

Watch the Video

Video by Blue Lightning. Any links or downloads mentioned by the creator are available only on YouTube

Understanding Text as Visual Art

Typographic portraits transform written language from a mere conveyor of meaning into a dynamic visual component. This artistic approach allows words to sculpt forms, define contours, and convey a subject's essence through the very text associated with them. By manipulating font, size, and arrangement, artists can create images that are both textual and illustrative.

The technique presented in this tutorial leverages this concept by using words to define the subtle curves and features of a face. This method relies on principles such as:

  • Displacement mapping: Distorting one image based on the tonal values of another.
  • Layer blending: Combining visual information from multiple layers to create a unified effect.

These elements contribute to the illusion that the text is physically wrapped around the subject's form, adding depth and realism to the portrait.

Practical Tips for Creating Text Portraits

  • Prepare a Displacement Map from your subject's desaturated image by applying a Gaussian Blur and saving it as a PSD file.
  • Refine selections around intricate areas like hair using the Refine Edge feature for cleaner edges.
  • Utilize online tools such as Wordle.net to efficiently generate word clouds from your chosen text, ensuring variety in word prominence.
  • Group multiple text layers into a Smart Object before applying the Displace filter to maintain editability and flexibility.
  • Experiment with text block rotation and sizing to ensure comprehensive coverage and natural flow across the subject's face.

More Tutorials about Photoshop Portrait Effects

Explore additional creative techniques to enhance and transform portraits using Photoshop.

Create a cool text portrait in Photoshop
Creating a text portrait in Photoshop is a sophisticated blend of photography and typography. In this tutorial by Marty from Blue Lightning TV, you'll learn how to transform a standard photo into a powerful typographic portrait. Starting with an optimal photo choice, Marty guides you through desaturating the image, refining the subject's edges, and setting up a new document. The tutorial then delves into the core process of integrating text, adjusting brightness and contrast for maximum impact,
Transform a face into a creative mixed media portrait
In this Photoshop tutorial by Marty Geller from Blue Lightning TV you will learn how to create the look of a mixed media portrait from a photo and how to replace your subject without having to redo the effects. Marty will guide you through all the steps required to create a beautiful artistic portrait effect, and also turn it into a template you can reuse by just adding other photos and getting the same results. Watch tutorial
How to Paint Your Face in Photoshop
This exciting tutorial by PHLEARN dives into the world of digital face paint. Learn how to utilize a custom face paint brush (potentially included in the video) and Adjustment Layers to create vibrant and realistic designs, perfect for both adorable Halloween looks or spooky transformations. The video will guide you through the process, allowing you to unleash your creativity and design unique face paint effects for any project. Watch tutorial
How to Paint Graphics onto a Face in Photoshop
This video, by Marty from Blue Lightning TV, will teach you a technique for painting images onto someone's face in Photoshop. The introduction walks you through the initial setup: opening the images you'll be working with, including a portrait and the graphic you want to paint onto the face. Then, it covers how to convert your subject into a smart object and create a duplicate layer. The next steps involve blurring the duplicated layer and converting it to black and white. After that, you'll le

Get tutorials & freebies delivered to you.

Subscribe to the Photoshop Roadmap newsletter, a weekly roundup of new tutorials, insights and quality downloads, trusted by 6500+ readers.

You might also like

How to Use Select Subject for Background Removal and Edge Refinement

Background removal becomes effortless when you know how to use the right tools. AI-powered selection can instantly isolate subjects from their backgrounds, but the real skill lies in refining those selections to create professional results. This guide covers the complete workflow from initial selection to edge refinement, plus creative techniques...

How to Wrap Text Around Any Shape in Photoshop

Creating text that flows naturally around irregular shapes transforms static layouts into dynamic, professional designs. This technique works particularly well for posters, magazine layouts, and editorial designs where text needs to integrate seamlessly with complex subjects rather than simply sitting in rigid rectangular boxes. The process combines selection tools, path...

How to Edit Text in Images Using Generative Fill

Changing text within existing images has traditionally required complex masking and reconstruction techniques. Modern AI-powered tools now make it possible to seamlessly replace words and phrases in photographs while maintaining realistic typography, lighting, and perspective that matches the original scene. This technique works particularly well for signs, storefronts, billboards, and...

How to Remove Dust and Sensor Spots Using Photoshop Tools

Dust spots and sensor particles are inevitable challenges in digital photography, appearing as dark specks that distract from otherwise clean images. Camera sensors collect dust over time, creating consistent spots that show up across multiple photos, particularly in bright sky areas or uniform backgrounds. Both Lightroom and Photoshop offer specialized...

Photoshop vs Affinity Photo: Feature Comparison and Professional Analysis

When choosing professional photo editing software, the decision often comes down to comparing features, performance, and value. This detailed comparison examines the core capabilities of both applications across noise reduction, smart selections, object removal, masking, and AI-powered tools. The analysis covers real-world scenarios that professionals encounter daily, from complex background...

Create Realistic Water Reflections Using Generative Fill in Photoshop

Traditional reflection techniques in photo editing often produce unrealistic results because they simply flip and copy existing image elements. Real reflections show different viewing angles and reveal surfaces not visible in the original photograph—like the underside of vehicles or objects viewed from below water level. Generative fill technology solves...

You’ve successfully subscribed to Photoshop Roadmap
Welcome back! You’ve successfully signed in.
Great! You’ve successfully signed up.
Success! Your email is updated.
Your link has expired
Success! Check your email for magic link to sign-in.