Create colorful dramatic skies with a simple blending trick in Photoshop

Create colorful dramatic skies with a simple blending trick in Photoshop

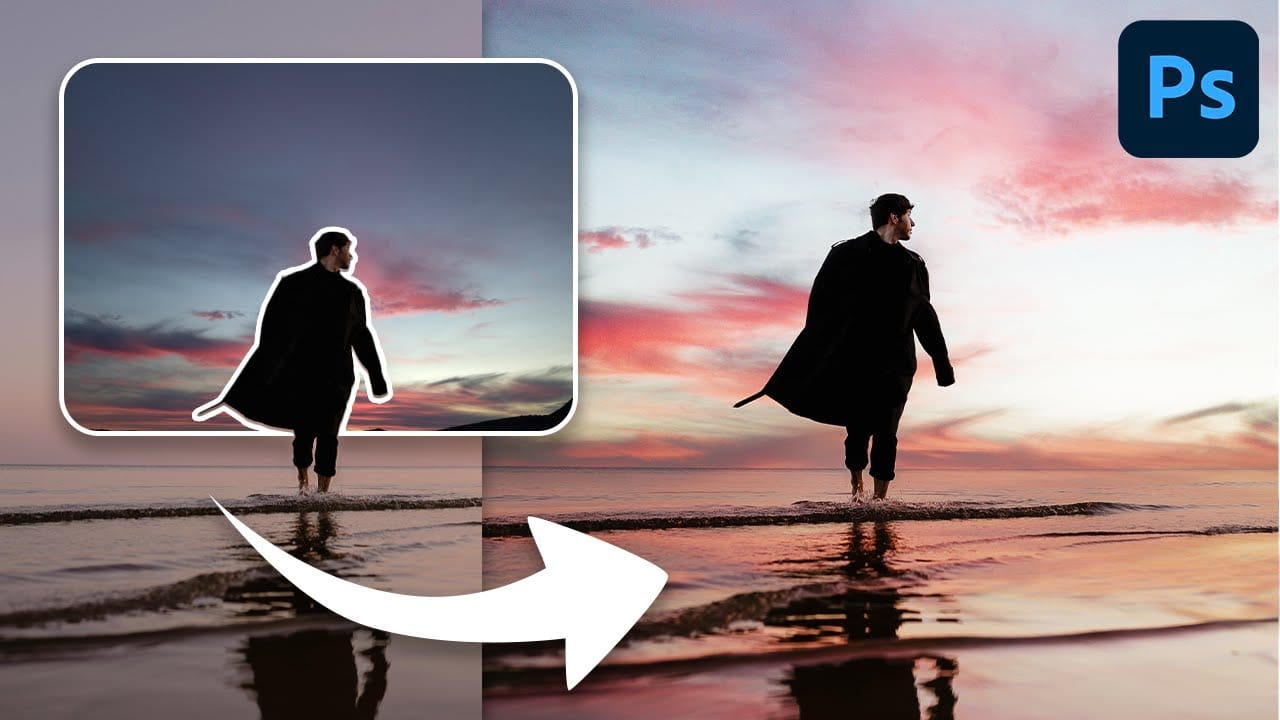
A photograph's impact often starts with its sky. A drab or overexposed backdrop can diminish an otherwise strong image, leaving it flat or uninspired. Elevate your photos by transforming ordinary skies into vibrant, dramatic elements that capture attention.

This guide explores a powerful, yet simple Photoshop technique. It uses the Blend If feature to effortlessly integrate colorful new atmospheric elements. You can create stunning, colorful skies that truly enhance your imagery.

Watch the Full Tutorial

Video by PiXimperfect. Any links or downloads mentioned by the creator are available only on YouTube

Unlocking Creative Control with Photoshop's Blend If

Photoshop's Blend If feature offers a non-destructive way to control layer visibility based on the brightness values of either the current layer or the underlying layers. This powerful tool provides granular control, allowing specific tonal ranges to show through or be hidden without the need for complex masks or tedious selections. It's particularly effective for blending painted effects into an existing image.

When enhancing skies, Blend If enables artists to introduce new colors and dramatic lighting that seamlessly interact with the original clouds and landscape. By adjusting sliders for the 'underlying layer,' one can make painted colors appear only in the darker areas of the sky, or conversely, reveal the brighter cloud details through the new color.

Splitting the sliders by holding Alt or Option ensures smooth, natural transitions, avoiding harsh edges and maintaining realism. This allows for a harmonious integration of new elements, making the sky appear as if it was captured that way originally.

Practical Tips for Enhancing Skies with Blend If

  • Begin by creating a new layer dedicated to painting your desired sky colors.
  • Sample existing sky colors as a base, then fine-tune the hue, saturation, and brightness to achieve your desired shade.
  • Utilize a soft brush with a low flow setting (e.g., 20-30%) for smooth, gradual color application across the sky area.
  • Apply the Blend If feature to your new color layer by moving the 'underlying layer' slider from right to left to reveal underlying bright details like clouds.
  • Split the Blend If slider by holding Alt or Option while clicking, which creates smoother, more natural transitions between visible and invisible areas.
  • Experiment with different blend modes, such as Overlay or Soft Light, to achieve varied aesthetic effects and color interactions.
  • Consider using separate layers for brightening and darkening sky areas, applying Blend If selectively to each for precise control.

More Tutorials about Sky Enhancement in Photoshop

Explore further techniques and creative approaches to transform skies in your images with these related resources.

Add clouds to a sky in Photoshop
In this Photoshop tutorial by Phlearn, you’ll learn how to replace the sky in an image, ensuring it complements the original photo in terms of color, contrast, and tone. Start by using the Move Tool to drag and drop the new sky onto your image, then turn off the layer. Select the old sky using a selection tool like the Magic Wand Tool. Once the selection is refined, turn the new sky layer back on and click the Layer Mask button to mask in just the sky. Unlink the layer from its mask to position
How To Easily Change The Sky In Photoshop
Transforming the mood and visual impact of a photograph often begins with its sky. A drab or overexposed sky can diminish the overall appeal of an otherwise great image, leaving it feeling flat or uninspired. Replacing the sky can dramatically enhance the scene, introducing vibrant colors, dramatic clouds, or a serene atmosphere. This tutorial provides a straightforward method for updating skies in Photoshop, allowing creators to effortlessly blend new atmospheric elements into their photos. It
How to Create a Dramatic Spotlight Effect in the Sky in Photoshop
Adding a dramatic spotlight effect to your images can transform an ordinary sky into a captivating scene, drawing the viewer's eye and enhancing the overall mood. This technique is particularly effective for emphasizing specific elements or creating a sense of grandeur and focus within a composition. In this tutorial, you will learn how to integrate a realistic spotlight with text into a stormy sky, utilizing Photoshop's powerful blending modes, transformation tools, and non-destructive editing
Starry Night Sky Effect in Photoshop
This tutorial demonstrates how precise selection techniques are crucial for isolating elements like trees and landscapes. It ensures that the subsequent addition of detailed celestial phenomena, such as stars and aurora borealis, seamlessly integrates with the original image. The process goes beyond simple overlays, showcasing how to invert layer masks to precisely apply effects to the sky while preserving the foreground. This unexpected inversion step is vital for achieving a visually compelli

Get tutorials & freebies delivered to you.

Subscribe to the Photoshop Roadmap newsletter, a weekly roundup of new tutorials, insights and quality downloads, trusted by 6500+ readers.

You might also like

Basic Photoshop techniques you really need to learn

Photoshop hasn’t changed as much as it looks. New features come and go, but the same core techniques keep showing up in real work. If you skip them, everything feels harder than it should. This post focuses on those basics, not as isolated tricks, but as skills you’ll...

How to Use Select Subject for Background Removal and Edge Refinement

Background removal becomes effortless when you know how to use the right tools. AI-powered selection can instantly isolate subjects from their backgrounds, but the real skill lies in refining those selections to create professional results. This guide covers the complete workflow from initial selection to edge refinement, plus creative techniques...

How to Wrap Text Around Any Shape in Photoshop

Creating text that flows naturally around irregular shapes transforms static layouts into dynamic, professional designs. This technique works particularly well for posters, magazine layouts, and editorial designs where text needs to integrate seamlessly with complex subjects rather than simply sitting in rigid rectangular boxes. The process combines selection tools, path...

How to Edit Text in Images Using Generative Fill

Changing text within existing images has traditionally required complex masking and reconstruction techniques. Modern AI-powered tools now make it possible to seamlessly replace words and phrases in photographs while maintaining realistic typography, lighting, and perspective that matches the original scene. This technique works particularly well for signs, storefronts, billboards, and...

How to Remove Dust and Sensor Spots Using Photoshop Tools

Dust spots and sensor particles are inevitable challenges in digital photography, appearing as dark specks that distract from otherwise clean images. Camera sensors collect dust over time, creating consistent spots that show up across multiple photos, particularly in bright sky areas or uniform backgrounds. Both Lightroom and Photoshop offer specialized...

Photoshop vs Affinity Photo: Feature Comparison and Professional Analysis

When choosing professional photo editing software, the decision often comes down to comparing features, performance, and value. This detailed comparison examines the core capabilities of both applications across noise reduction, smart selections, object removal, masking, and AI-powered tools. The analysis covers real-world scenarios that professionals encounter daily, from complex background...

You’ve successfully subscribed to Photoshop Roadmap
Welcome back! You’ve successfully signed in.
Great! You’ve successfully signed up.
Success! Your email is updated.
Your link has expired
Success! Check your email for magic link to sign-in.