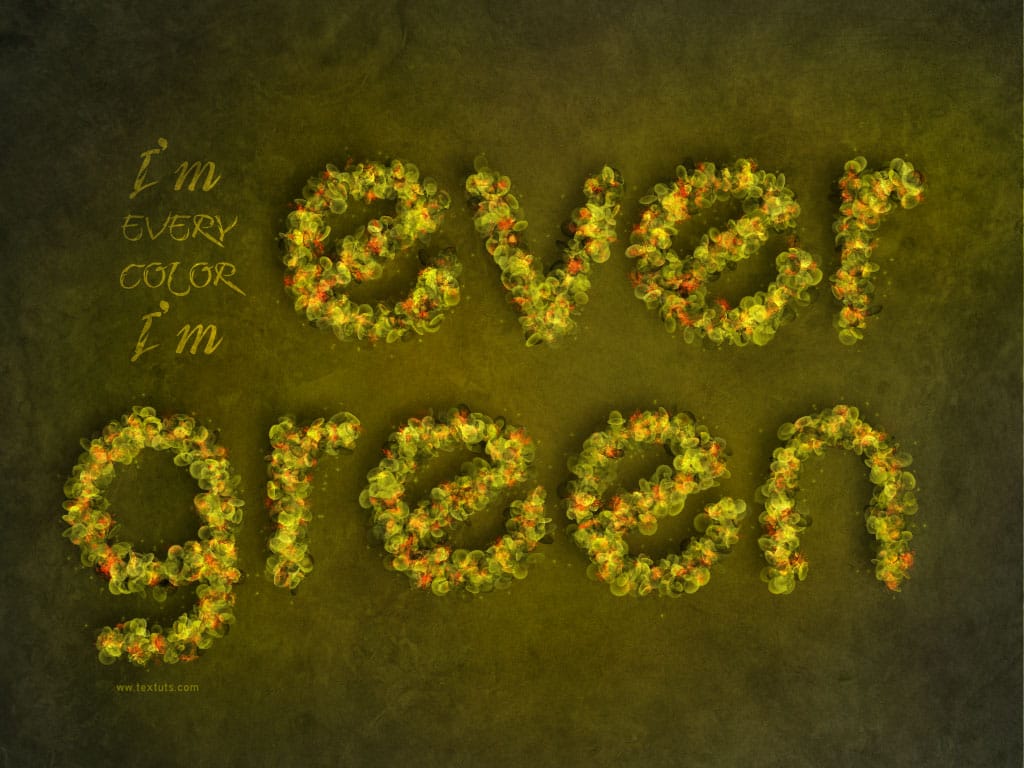
Learn to create stunning floral typography in Photoshop. This tutorial teaches you to blend vibrant flowers with custom text, achieving a captivating visual that seamlessly integrates botanical elements with your design. Master techniques for realistic depth, perfect for unique posters, art, or personal projects.
Watch the Full Tutorial
Video by tutvid. Any links or downloads mentioned by the creator are available only on YouTube
Practical Tips for Crafting Floral Text Effects
- Convert masked images to Smart Objects early in the process to maintain editability of layer masks and transformations.
- Expand your canvas using the Crop Tool to provide ample working space for composition and background elements.
- Utilize color fill layers for backgrounds; they automatically adapt to canvas size changes, simplifying adjustments.
- Hand-paint subtle shadows beneath elements that appear to overlap or tuck behind others for highly realistic depth control.
- Apply a High Pass filter to a merged copy of key layers (flowers, text, border) for a final sharpening pass, enhancing edge detail.
More Tutorials about Floral Text Effects
Explore more resources and step-by-step guides to further develop your skills in creating unique text effects and floral designs.
How to Create a Floral Typography Text Effect in Photoshop
In this Photoshop tutorial by Spoon Graphics, you'll learn how to create a popular floral typography effect, combining type with images of flowers to produce beautiful artwork.
The tutorial starts by creating a composition of floral illustrations, then adding text and erasing specific portions to make the flowers appear to surround the text, with petals and stems overlapping. To enhance the effect, a clever shading technique is demonstrated to add depth with realistic drop shadows.
This step-b

Create a Fantasy Spring Blossoms Text Effect in Photoshop
This tutorial will guide you through the process of creating a charming text effect inspired by the beauty of spring. You will start by designing a simple brush that captures the essence of leaves and flowers, adding a touch of nature to your work.
Next, you'll learn how to modify the brush settings to achieve a delicate and fresh look. These adjustments will help you create a text design that feels both vibrant and whimsical, perfect for any spring-themed project.
Whether you are a beginner o
Leafy Text Effect Photoshop Tutorial
In this tutorial by Spoon Graphics, you'll learn how to create a text covered with leaves in Adobe Photoshop.
The tutorial guides you through the process of designing text made up of tiny leaves, vines, and water droplets. While the tools and techniques used are straightforward, the tutorial emphasizes the importance of patience in achieving a complex and detailed final result.
The outcome is a stunning and intricate piece of eco-themed artwork that showcases the beauty of nature.
Watch tutor

Create a Beautiful Floral Fractal Illustration in Photoshop
This tutorial will show you how to create a beautiful and simple fractal image based on a flower. This is actually impossible with Photoshop’s standard plugins, so we are going to use the stunning Fractal Explorer free filter that is run using the Pixel Bender plugin.
👁️This is an older tutorial, and some external links or data sources mentioned may no longer be accessible. However, the content covers a unique topic and remains valuable despite any broken connections. We’ve kept the post intac