How to Transform a Photo Into a LEGO Portrait

How to Transform a Photo Into a LEGO Portrait

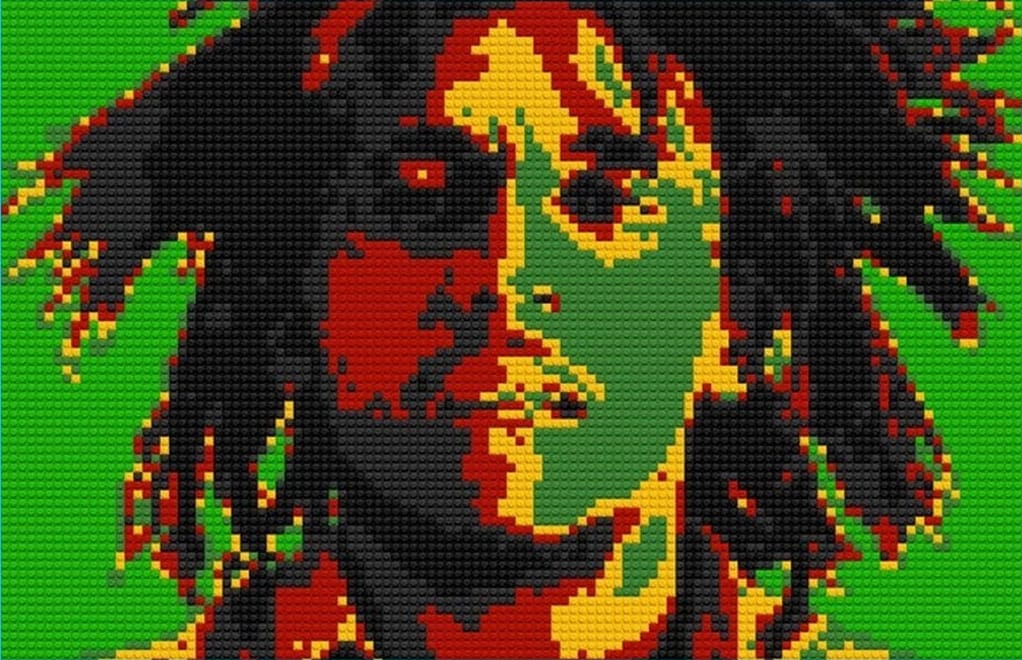
The transformation of a digital image into a mosaic of LEGO bricks offers a unique artistic interpretation. This technique allows creators to reimagine photographs with a distinct, block-based aesthetic, evoking a sense of nostalgia and playful creativity.

In this tutorial, you will discover how to apply this captivating LEGO effect to virtually any photograph using Adobe Photoshop. The process covers essential steps from initial image preparation and non-destructive editing to creating a custom LEGO pattern and enhancing the final colors.

Watch the Tutorial

Video by Blue Lightning. Any links or downloads mentioned by the creator are available only on YouTube

The Aesthetic of Pixelated Art

Pixelation, at its core, involves rendering an image at a low resolution or intentionally reducing its detail to create a blocky, abstract appearance. This digital art form draws parallels to traditional mosaic art, where small, distinct pieces are assembled to form a larger picture. In the context of digital imaging, each pixel becomes a discernible unit, contributing to the overall composition rather than blending seamlessly.

Extending this concept, LEGO art translates digital pixels into physical or simulated plastic bricks. Each LEGO stud and base represents a 'pixel,' allowing for a tangible interpretation of digital resolution. The challenge lies in balancing the inherent blockiness with enough detail to ensure the original subject remains recognizable, creating a stylized yet clear representation.

The charm of LEGO portraits comes from this deliberate simplification. It forces the viewer to appreciate the image as an assembly of discrete components, highlighting the underlying structure and color relationships that define the original photograph. This artistic choice can evoke a nostalgic connection to childhood toys while showcasing a sophisticated understanding of digital image manipulation.

Practical Tips for Creating LEGO Portraits

  • Convert your original photo to a Smart Object to enable non-destructive modifications and preserve the original image data.
  • Adjust the image resolution to 72 pixels per inch and the height to 2000 pixels for optimal results with the mosaic effect.
  • Set the Mosaic filter's Cell Size to 50 pixels square to ensure consistent and appropriately sized LEGO "bricks."
  • Define a custom pattern with a 50-pixel square base and a centered circle for the stud, matching the mosaic cell size for accurate overlay.
  • Experiment with the Posterize levels (between 4 to 8) and adjust Hue/Saturation to achieve the desired color depth and vibrancy for your LEGO portrait.

Explore more creative ways to transform your photos and expand your digital art skills with these related articles and tutorials.

Create a Lego Portrait Effect in Photoshop
In this tutorial, you will learn how to create a portrait made of Legos in Adobe Photoshop. The process may seem daunting at first, but with the clear step-by-step instructions, you'll be able to achieve impressive results. The tutorial covers the basics of setting up your canvas, selecting the right Lego colors, and arranging them to form the desired portrait. You'll also learn how to add realistic shadows and highlights to make the Lego pieces look more authentic. By the end of this tutorial
Transform Photos into Jigsaw Puzzles in Photoshop
Marty Geller from Blue Lightning TV has created a Photoshop tutorial that teaches users how to transform photos into a variety of different sized, jigsaw puzzles. The tutorial utilizes Adobe's free jigsaw puzzle plugin, allowing users to easily create these puzzle-like images. Additionally, the tutorial shows users how to create a retro-style pattern to serve as the background for the puzzles. By following this step-by-step guide, users can experiment with this unique and creative way of present
How to turn a photo into a cartoon in Photoshop
Welcome to this new Photo to Cartoon Effect “cartoonize yourself” Photoshop Tutorial. Through this tutorial, and with the power of smart objects you will learn how to cartoonize photos in photoshop and convert almost any photo into a caricature cartoon effect using some filters and smart objects in photoshop. After finishing this tutorial, you will be able to drag your picture into the PSD file and turn any photo to cartoon effect with a couple clicks. watch the tutorial and cartoonize yourself
Photoshop: Make a Marble Sculpture Bust from a Photo
This Photoshop tutorial by Marty Geller from Blue Lightning TV shows how to turn a portrait photo into a classy marble sculpture using Photoshop. No fancy tricks, just a well-explained process. Learn how to isolate your subject, work with grayscale tones, and add textures to create a realistic marble effect. The presenter guides you through each step, making it accessible for both beginners and experienced users. The end result is more than just an edited photo. It's a digital portrait with the

Get tutorials & freebies delivered to you.

Subscribe to the Photoshop Roadmap newsletter, a weekly roundup of new tutorials, insights and quality downloads, trusted by 6500+ readers.

You might also like

How to Wrap Designs Around Complex Objects Using Displacement Maps in Photoshop

Professional mockups require more than simply placing a design onto an object. Complex surfaces like crushed aluminum cans demand advanced techniques to achieve realistic wrapping that follows every contour and deformation. This process combines displacement mapping, smart objects, and blending modes to create reusable templates that automatically conform any design...

How to Fix Three Confusing Default Settings in Photoshop

Sometimes Photoshop's default settings can make beginners think their software or hardware is broken. Images that fly around uncontrollably when panning, scroll bars appearing on full-size images, and zoom tools that seem to have a mind of their own are all caused by simple preference settings that can...

How to Create Better Shadows Than Drop Shadow in Photoshop

The basic drop shadow effect often looks flat and artificial compared to how shadows actually behave in real environments. Professional designers know that convincing shadows require understanding light direction, surface interaction, and atmospheric perspective. This technique demonstrates how to create custom shadows that respond naturally to your composition's...

How to Customize Your Photoshop Toolbar and Find Hidden Tools

A cluttered toolbar can slow down your workflow when you can't find the tools you need. Meanwhile, dozens of useful tools remain hidden in groups or completely out of sight. Learning to customize your toolbar lets you organize tools according to your actual workflow, remove tools you never...

How to Change Backgrounds and Match Lighting in Photoshop

Creating seamless background replacements requires more than just cutting out your subject. The real challenge lies in making the new composition look natural through proper lighting, color matching, and depth of field consistency. Modern Photoshop tools have simplified this process significantly, allowing you to achieve professional results with automated background...

How to Create a Colorful Aura Effect for Portraits in Photoshop

Portrait photography becomes truly captivating when enhanced with atmospheric effects that draw the viewer's eye. The colorful aura effect transforms ordinary portraits into striking visual statements by surrounding the subject with ethereal, glowing light that feels both magical and professional. This technique works best with portraits shot against...

You’ve successfully subscribed to Photoshop Roadmap
Welcome back! You’ve successfully signed in.
Great! You’ve successfully signed up.
Success! Your email is updated.
Your link has expired
Success! Check your email for magic link to sign-in.