Spray Painted Stencil Text Effect in Photoshop

Spray Painted Stencil Text Effect in Photoshop

Achieving the raw, unrefined look of spray paint can add a distinctive, urban edge to your digital designs. This style often feels complex to recreate without freehand artistry. However, Photoshop offers powerful tools that allow designers to capture this aesthetic through systematic application, mimicking the spontaneous nature of spray paint without requiring any manual brushwork.

This tutorial guides you through using filters, blend modes, and textures to generate natural-looking overspray, speckles, and grungy details. You can transform ordinary text into a compelling, street-art inspired graphic with precise settings and layered elements.

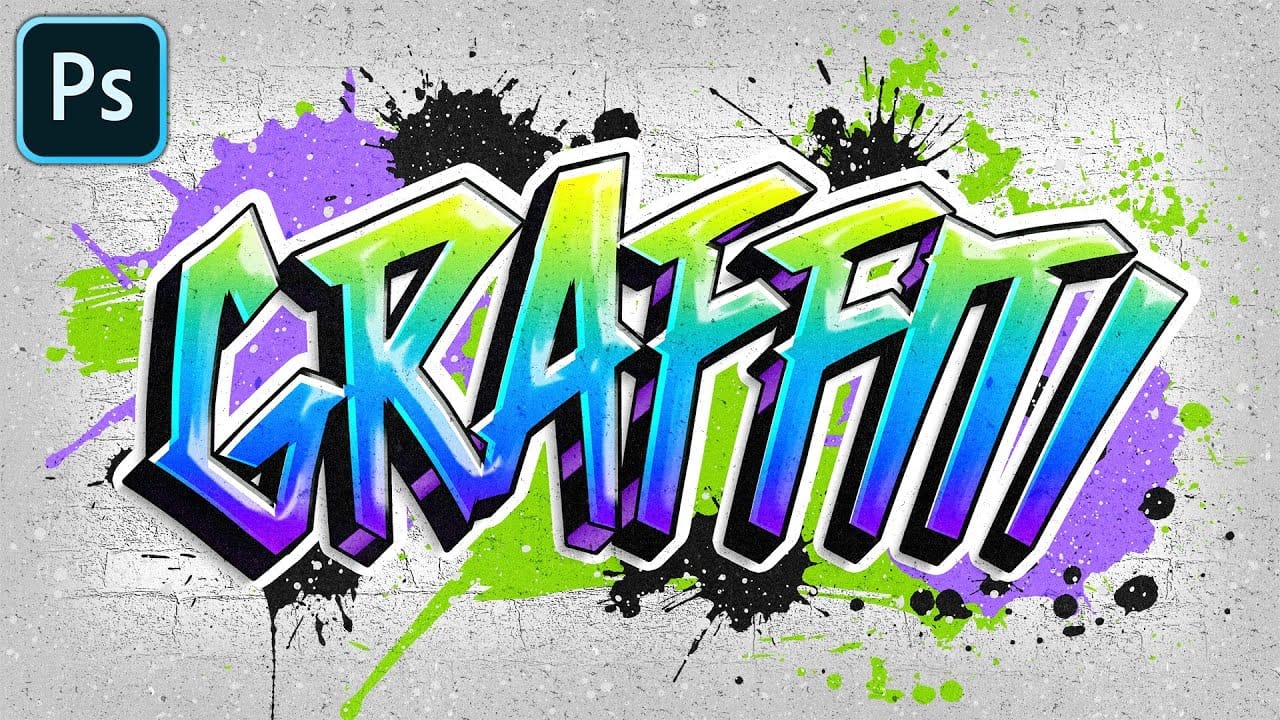
Learn to Create a Spray Paint Effect

Video by Texturelabs. Any links or downloads mentioned by the creator are available only on YouTube

Mastering Digital Spray Paint Textures

The creation of a convincing spray paint effect in Photoshop goes beyond simply adding noise or blur. This technique leverages specific filters and blend modes in a calculated sequence to simulate the organic imperfections inherent in real spray paint. Key to this process is the strategic use of features like the Lens Blur filter, which, when paired with a custom mask, can generate varying degrees of blur to mimic both overspray and areas of sharp focus.

Further realism is achieved by applying the Dissolve blend mode at low opacity, which introduces a speckled, gritty texture. The method emphasizes combining these digital manipulations with actual paint and grunge texture assets, then refining the overall composition with targeted Levels adjustments. This layered approach ensures a rich, authentic finish that looks less like a digital effect and more like a physical art piece.

  • Lens Blur with a depth map for varied spray patterns.
  • The Fade option to precisely control filter intensity.
  • Dissolve blend mode to generate natural speckle textures.
  • Incorporating diverse texture assets for enhanced realism.
  • Strategic use of Levels adjustments to refine contrast and mood.

Practical Tips for Spray Painted Text Effects

  • Rasterize your type layer before applying filters to enable full layer manipulation.
  • Utilize the Fill (Shift+F5) command with the "Behind" blending mode to efficiently convert transparent text backgrounds to solid black.
  • Apply Lens Blur using a custom layer mask as a depth map to create randomized areas of blur and sharpness, simulating spray inconsistencies.
  • Immediately after applying a filter, use the Fade (Command+Shift+F) option to fine-tune its opacity or blending mode, preserving definition.
  • Set the layer's blend mode to Dissolve and slightly reduce its opacity to introduce a speckled, gritty texture across the effect.

More Tutorials about Text Effects

Explore additional creative text effects to enhance your design skills in Photoshop.

Colorful Painted 3D Text Effect Tutorial in Photoshop
In this tutorial by Angelo Konofaos, you'll explore how to create a 3D-style text effect in Photoshop, alongside techniques like adding shadows, highlights, shines, and colors. Utilizing a variety of Photoshop tools such as the Mixer Brush, Pen Tool, clipping masks, and adjustment layers, the tutorial demonstrates the process of refining text to achieve a polished and dimensional look. For optimal results, Konofaos recommends using a pen tablet like the Wacom Intuos to enhance precision and fl
How to create a dripping paint text effect in Photoshop
In this tutorial, you will discover how to create a striking paint-dripping effect using Adobe Photoshop. This guide breaks down the process into clear, manageable steps, making it easy for you to follow along, regardless of your skill level. First, you will start by preparing the base image, where you will add the paint element. Then, you’ll learn how to manipulate and position the paint to achieve the desired dripping effect. Each step includes helpful tips and tricks to enhance your work. F
Colorful Graffiti Text Effect in Photoshop
In this tutorial from PhoTuts, you'll learn to create a vibrant and editable graffiti text effect on a concrete wall using basic Photoshop techniques. Embracing an urban street art style, the tutorial guides you through transforming text into striking graffiti, complete with bold colors and realistic textures. Perfect for adding an edgy, contemporary flair to your designs, this tutorial offers insights into creating impactful digital art inspired by street culture. Watch tutorial
Leafy Text Effect Photoshop Tutorial
In this tutorial by Spoon Graphics, you'll learn how to create a text covered with leaves in Adobe Photoshop. The tutorial guides you through the process of designing text made up of tiny leaves, vines, and water droplets. While the tools and techniques used are straightforward, the tutorial emphasizes the importance of patience in achieving a complex and detailed final result. The outcome is a stunning and intricate piece of eco-themed artwork that showcases the beauty of nature. Watch tutor

Get tutorials & freebies delivered to you.

Subscribe to the Photoshop Roadmap newsletter, a weekly roundup of new tutorials, insights and quality downloads, trusted by 6500+ readers.

You might also like

Complete Photoshop Editing Workflow: 5 Steps from Raw to Polished

Photoshop offers endless possibilities for photo enhancement, but many photographers never move beyond basic adjustments because the software feels overwhelming. This comprehensive workflow breaks down photo editing into five manageable stages that work consistently across different photography styles. The systematic approach covers everything from initial raw processing to advanced lighting...

Photoshop Workspace Basics: Navigation, Zooming, and Essential Interface Elements

Photoshop's interface can feel overwhelming when you first open the program. Dozens of panels, tools, and menus compete for attention, making simple tasks feel complicated. This tutorial breaks down the essential workspace elements and teaches fundamental navigation skills that form the foundation of efficient Photoshop work. Watch the...

How to Restore Old Damaged Photos Using Nano Banana in Photoshop

Old family photos with scratches, tears, and missing sections can seem beyond repair. Google's Nano Banana AI model, now integrated into Photoshop, makes full restoration possible in minutes rather than hours. This powerful tool excels at maintaining facial characteristics while automatically filling in damaged areas and adding realistic...

How to Get Higher Quality Results from Photoshop's Generative Fill Tool

Photoshop's Generative Fill creates impressive AI extensions, but the results often look blurry and pixelated when viewed at full size. This quality limitation makes many AI-generated areas unusable for printing or large displays. This technique shows how to work around the 1024x1024 pixel quality limit to create much...

How to Use Photoshop's Liquify Tool for Non-Destructive Portrait Retouching

Clothing wrinkles, hair that lacks volume, and awkward fabric bunching can distract from an otherwise great portrait. Photoshop's Liquify tool offers a powerful solution for smoothing out these issues while preserving the natural look of your subject. This tutorial demonstrates how to use the Liquify tool non-destructively with...

You’ve successfully subscribed to Photoshop Roadmap
Welcome back! You’ve successfully signed in.
Great! You’ve successfully signed up.
Success! Your email is updated.
Your link has expired
Success! Check your email for magic link to sign-in.