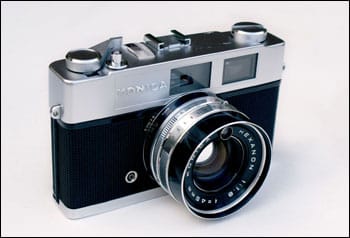
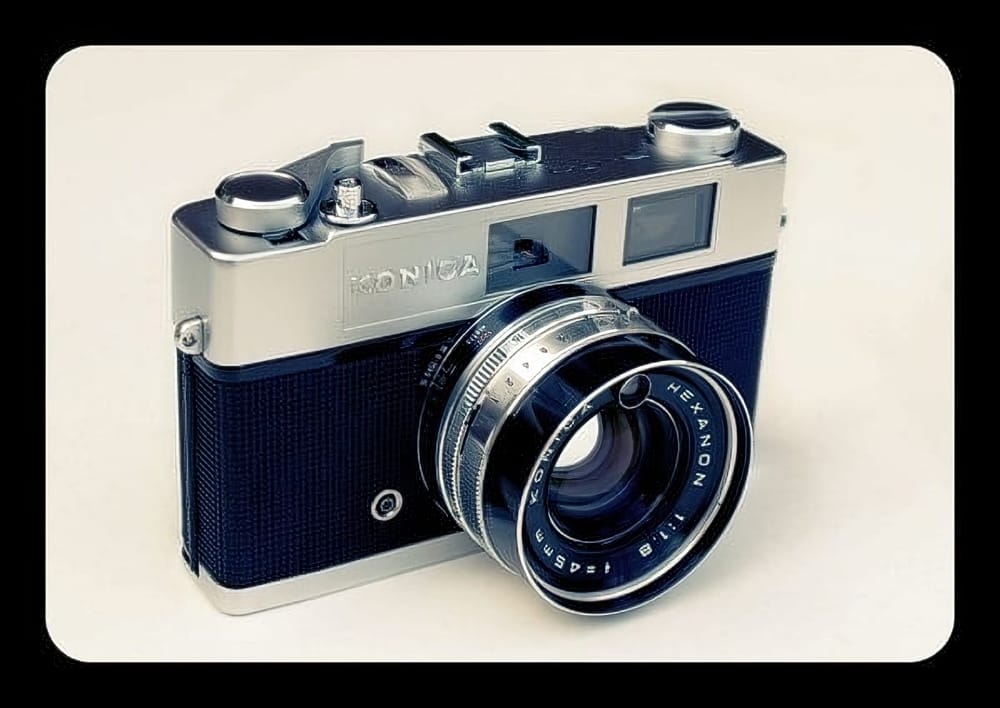
Ever wanted to shoot Polaroid again but can´t seem to find any film for that old dusty polaroid camera in your father´s basement? Well, in this tutorial I´ll show you how you can achieve that old faded Polaroid look in a snap using Photoshop´s Curves Adjustments.


The first thing we are going to do is to select our curves adjustment by clicking on the “new layer adjustment” icon at the bottom of your Layers Palette.
We´re going to start with the red channel. Here what we want to achieve is a small S-curve that brings in a bit of reds in your highlights but at the same time eliminates the reds in your shadows. Try to get it to look like mine.
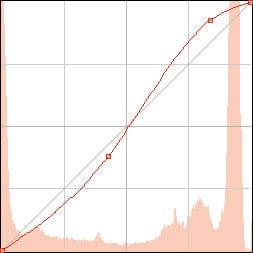
Next we´re going to go to the green channel. This time we´re going to tweak it ever so slightly. Again, a small S-curve that brings in a bit of greens into your highlights but at the same time eliminates the greens in your shadows.
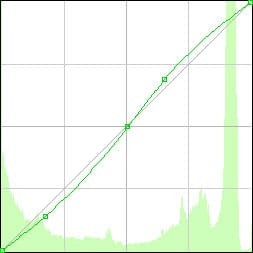
Now onto the blue channel. In this case we are going to do the opposite as in the red channel.
This time we´re going bring in some blues in your shadow areas and at the same time eliminate them from your highlights to get those creamy highlights and dark shadows
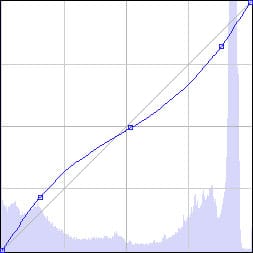
Finally, go to your RGB channel to add a small boost to your contrast. There you can see all you adjustments at the same time. Concentrate on the black diagonal. Create a small S-curve to slightly increase the contrast. If you find it more comfortable, go on ahead and use your Levels Adjustment to increase contrast. Remember, we´re going for that faded look so make sure your highlights don´t blow out.
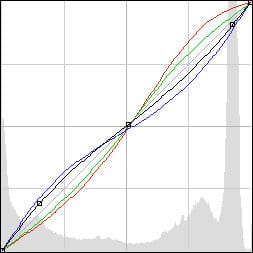
Remember you can always go back and tweak your curves adjustments for a specific image but this is generally how you want it to look. One last really cool thing you can do with this curves adjustment is save it as a preset. That way you can select it from you curve adjustments presets without having to go through the process again.
To do this, click on the preset options icon located at the top of your curves adjustment window. Save the preset and you should now be able to select it from the preset menu in your curves adjustment window whenever you want to use it!
Another thing I want to do to this image is add a Photo Filter to cool it down a bit. Again, go to you layer adjustments at the bottom of your layers palette and selecte “Photo Filter”
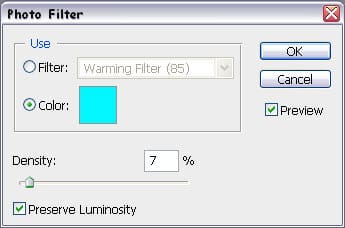
In you Photo Filter window you can select a variety of common filters used in photography but we want to use a custom filter so select Color instead of filter. Next click on the colored square next to it to select your custom filter color. This will bring up your color picker window where you´re going to input the color #01f7ff there at the bottom. Finally, give it a density of about 7-10%, depending on your image, and make sure you have the “Preserve Luminosity” box selected.
The last color adjustment I want to do to this image to achieve that faded look of an aged photograph is to desaturate it. Go down to your layers adjustment and select Hue/Saturation.
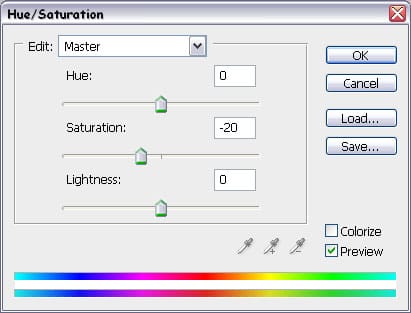
In this window we´re going to desaturate specific colors. First of all, set your master to -20 saturation as pictured above. Next go to your reds and set those to -10 saturation, greens to -20 and lastly your blues to +8.
Now that we have the color adjustment we were looking for, how about creating a vintage frame for your image? Back in the day it was quite common to get prints with rounded corners. Some cameras even created rounded corners on your negatives! We can achive this very easily in Photoshop using a Clipping Mask.
The first thing we need to do is release your background layer. Do this by double-clicking on it and then pressing “OK”. This way we can add some layers below the original background layer. We won´t be using this layer for the moment so you can make it invisible by clicking on the little eye next to the layer.
Now create a new layer and drag it below your image. Grab your paint bucket from your Tools window on your left and paint that layer solid black.
Next, select the Rounded Rectangle Tool from your Tools window. To create the rounded corners you have to input the amount of Radius you want in the corners. This will depend entirely on your image size so you´ll have to check and see which Radius you like most. Once you have selected the Radius form a rectangle from the top left corner to your bottom right corner. Try to keep it centered.

Now what we are going to do is increase our canvas size. Go to Image > Canvas size. Increase the size of your canvas in equal proportions. Again, the size will depend entirely on the size of your image. You will notice that the black layer now seems smaller than before. Select your paint bucket again and piant it black again so that the black reaches the borders.
Finally, let´s recover the visibility of our image layer by pressing on the square where the eye was before. Right click on that layer and select “create clipping mask”. A little arrow facing down should appear next to your layer thumbnail indicating that that layer is indeed a Clipping Mask. A Clipping Mask is basically like a cutout shape that lets part of the image through and other parts invisible depending what your shape is (a star, a circle, a rounded rectangle, even text!).
There you have your rounded corners!
Here´s what your layers palette should look like in case you got lost:
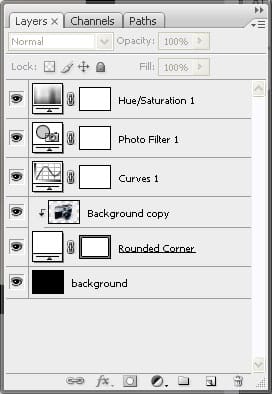
Well, that about does it. Hope you found this tutorial useful for your creative endeavors.If you want to check out what my Curve Adjustment Preset look like you can download it Here. Here´s the before and after image:
