Electric chrome text effect Photoshop Tutorial

Electric chrome text effect Photoshop Tutorial

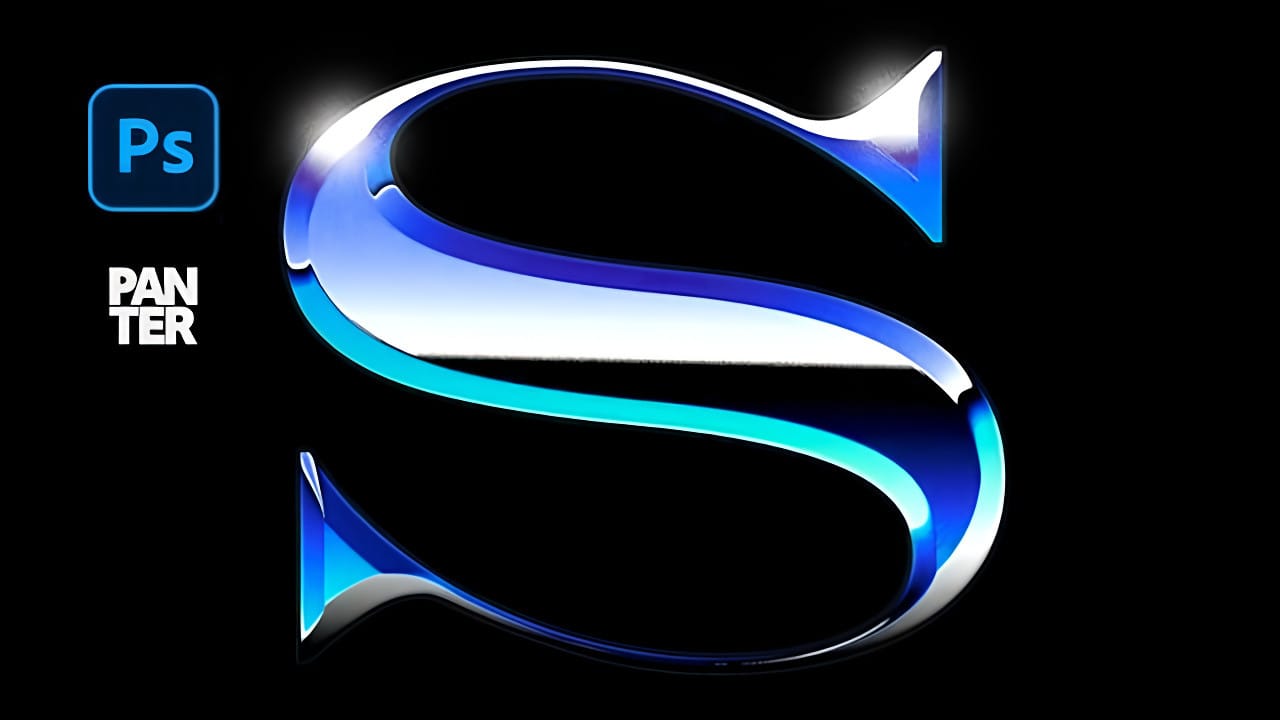
Enhance your designs with an electric chrome text effect, adding a vibrant, metallic sheen and modern edge. This tutorial demonstrates creating this captivating look in Adobe Photoshop, primarily using layer blending options, to transform ordinary text into a glowing chrome masterpiece.

Watch the Video Tutorial

Video by Anko Design. Any links or downloads mentioned by the creator are available only on YouTube

The Art of Chrome Effects Through Layer Blending

Achieving a sophisticated chrome effect in Photoshop largely hinges on the strategic application of layer blending options. These powerful tools allow designers to craft intricate metallic textures and dynamic lighting, transforming flat text into a dimensional work of art. Understanding how individual layer styles interact, from Bevel & Emboss to Outer Glow, is crucial for building a cohesive and visually striking result.

This approach offers significant control over the appearance of reflections, highlights, and shadows, which are fundamental to realistic metallic aesthetics. Adjusting settings like depth, size, and contour within Bevel & Emboss, alongside the judicious use of blend modes, enables a high degree of customization to match various design requirements. The subtle interplay of these elements brings the 'electric' quality to life, creating a vibrant, luminous finish.

  • Layer Blending Options: The core of creating complex metallic and lighting effects.
  • Pixel-Based Settings: How Bevel & Emboos values (depth, size) are relative to canvas and text resolution.
  • Color Dodge Highlight Mode: Essential for achieving luminous, bright highlights in the chrome.
  • Contour Adjustments: Fine-tuning the appearance of the gloss and reflections within the bevel.
  • Subtle Details: Incorporating additional elements like glow lines and background gradients to complete the look.

Practical Tips for Crafting Chrome Text Effects

  • Adjust Bevel & Emboos settings based on your document and text size, as they are pixel-dependent.
  • Utilize Color Dodge for highlights within layer styles to achieve a bright, luminous chrome appearance.
  • Add subtle details by creating new layers for lines and extra glows to enhance the electric effect.
  • Press and hold the Shift key while drawing with the brush tool to create perfectly straight horizontal or vertical lines.
  • Incorporate a background gradient using colors from your design to complement and unify the overall chrome aesthetic.

More Tutorials about Text Effects in Photoshop

Explore further techniques to enhance your typographic designs and discover new creative possibilities in Photoshop.

How to Create Retro Chrome Text Effects in Photoshop
Chrome text effects instantly elevate any design with their sleek, metallic finish and dimensional depth. The reflective surfaces and gradient layers create that premium, high-end aesthetic perfect for retro-futuristic designs, gaming graphics, and eye-catching headlines. This tutorial demonstrates how to build convincing chrome effects using layer styles, gradient mapping, and color blending techniques that transform ordinary text into polished metallic artwork. Watch the Video Tutorial Un
How to Create Gradient Chrome Text Effect in Photoshop
Chrome effects elevate text from ordinary typography into polished, metallic masterpieces that command attention. The reflective surfaces and dimensional depth create that premium look perfect for modern logos, eye-catching headlines, and promotional graphics that need to stand out. This technique demonstrates how to build realistic chrome text using gradient overlays,
Colorful Painted 3D Text Effect Tutorial in Photoshop
In this tutorial by Angelo Konofaos, you'll explore how to create a 3D-style text effect in Photoshop, alongside techniques like adding shadows, highlights, shines, and colors. Utilizing a variety of Photoshop tools such as the Mixer Brush, Pen Tool, clipping masks, and adjustment layers, the tutorial demonstrates the process of refining text to achieve a polished and dimensional look. For optimal results, Konofaos recommends using a pen tablet like the Wacom Intuos to enhance precision and fl
Leafy Text Effect Photoshop Tutorial
In this tutorial by Spoon Graphics, you'll learn how to create a text covered with leaves in Adobe Photoshop. The tutorial guides you through the process of designing text made up of tiny leaves, vines, and water droplets. While the tools and techniques used are straightforward, the tutorial emphasizes the importance of patience in achieving a complex and detailed final result. The outcome is a stunning and intricate piece of eco-themed artwork that showcases the beauty of nature. Watch tutor

Get tutorials & freebies delivered to you.

Subscribe to the Photoshop Roadmap newsletter, a weekly roundup of new tutorials, insights and quality downloads, trusted by 6500+ readers.

You might also like

How to Change Object Colors in Photoshop Using Hue/Saturation

Changing the color of specific objects in your photos requires precision and the right technique. The key is creating an accurate selection and using a targeted adjustment layer that affects only your chosen subject while preserving the rest of the image. This method combines the Object Selection tool with Hue/...

Create a Distorted Wave Glitch Effect in Photoshop

Digital distortion effects transform ordinary portraits into striking visual art by warping reality through deliberate technical manipulation. This technique uses multiple wave filters layered together to create increasingly complex distortions, while selective masking preserves important facial features from becoming completely unrecognizable. Watch the Video Practical Tips Master the wave distortion...

How to Create Glow Motion Effects with Gradient Maps in Photoshop

Motion blur combined with colorful gradients creates striking visual effects that transform ordinary photos into dynamic, cinematic images. This technique uses gradient maps to automatically color light and dark values, producing flowing color transitions that follow the movement of your subject. The process involves subject isolation, strategic gradient placement, path...

How to Use Reference Images with Generative Fill in Photoshop

Reference images revolutionize how Generative Fill works, letting you guide AI with actual photos instead of text prompts. This feature enables precise clothing swaps, object replacements, and realistic additions by showing the AI exactly what you want rather than describing it. The technique works with everything from custom t-shirts and...

How to Remove Eye Bags Using Dodge and Burn in Photoshop

Eye bags can dramatically age a portrait, making subjects appear tired or unhealthy. Traditional removal methods often destroy skin texture or create unnatural results that look obviously retouched. This professional dodge and burn technique removes even severe eye bags while preserving every detail of natural skin texture. The method uses...

You’ve successfully subscribed to Photoshop Roadmap
Welcome back! You’ve successfully signed in.
Great! You’ve successfully signed up.
Success! Your email is updated.
Your link has expired
Success! Check your email for magic link to sign-in.