Create waterdrops in Photoshop

Create waterdrops in Photoshop

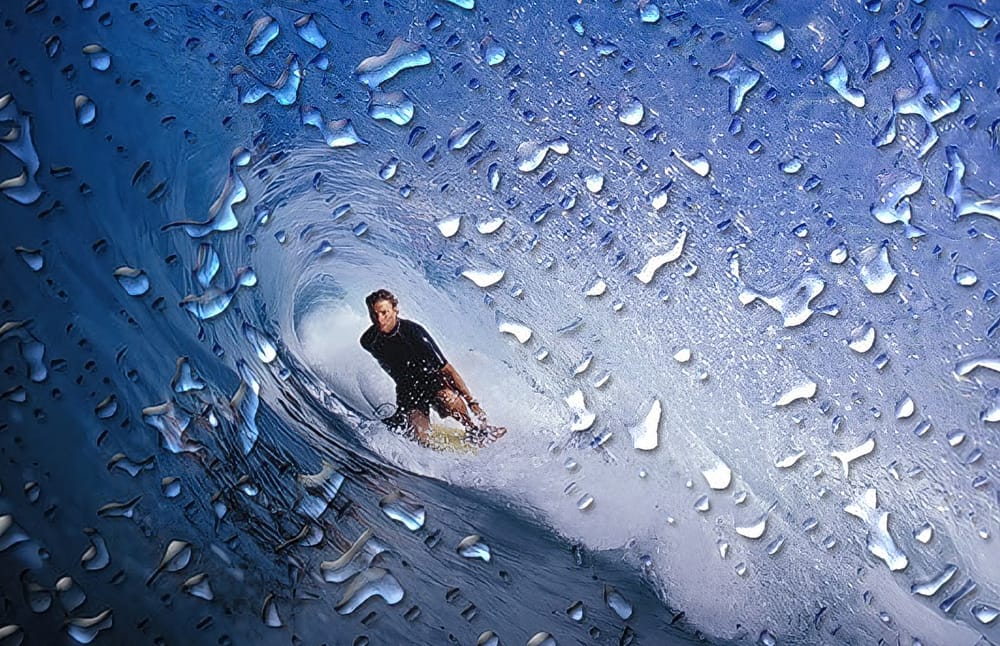
A simple gradient applied from the upper left corner to the lower right corner forms the foundation of convincing digital water drops. This technique transforms a basic circular selection into droplets that appear to hold actual depth and weight on any surface. The effect relies on precise layer style combinations and strategic highlight placement rather than complex filters or specialized brushes.

Watch the Video

Video by Blue Lightning TV. Any links or downloads mentioned by the creator are available only on YouTube

The Science Behind Digital Water Drop Effects

Water drops appear three-dimensional because of how light interacts with their curved surfaces. The meniscus creates natural gradients from bright highlights to deeper shadows, while surface tension maintains the characteristic dome shape. Digital recreation requires mimicking these optical properties through careful gradient placement and shadow modeling.

The Overlay blend mode becomes essential because it preserves both highlights and shadows while allowing the underlying image to show through. This mimics how real water drops remain transparent while still casting shadows and reflecting light. The combination of inner shadows and drop shadows creates the dual effect of the drop sitting on a surface while also appearing to have internal depth.

Layer styles provide the most control over these effects because they remain editable and scale proportionally. The specific angle settings for shadows (-30 degrees for inner shadow, 127 degrees for drop shadow) correspond to natural lighting conditions where light sources create consistent shadow directions across multiple drops.

Practical Tips for Creating Water Drops

  • Hold Shift while dragging with the Elliptical Marquee Tool to maintain perfect circular selections for realistic drop shapes
  • Position gradients from upper left to lower right to match natural lighting patterns and create convincing depth
  • Adjust Distance and Size values in layer styles based on your image resolution to maintain proper proportions
  • Use the Liquify filter's Forward Warp tool to create irregular drop shapes that mimic real water behavior on surfaces
  • Group drop layers with their highlights before duplicating to maintain proper relationships when creating multiple drops

More Tutorials about Water Effects

Explore additional water-related Photoshop techniques and creative effects.

Add Realistic Water Drops To A Photo
This Photoshop Effects tutorial guides you in adding realistic water drops to your photos, making it seem as though water has splashed across the image. You'll explore various filters and adjustments to create random shapes that resemble water droplets. The tutorial emphasizes the importance of using simple layer styles to enhance these shapes, focusing on adding shadows and highlights. This technique helps in achieving that lifelike quality you desire in your images. To wrap up the process, a
Learn How to Create a Watercolor Photo Effect in Photoshop
In this tutorial by Blue Lightning TV, Marty demonstrates how to transform an ordinary photograph into a stunning hand-painted watercolor painting using Photoshop. This method surpasses the built-in watercolor filter in Photoshop by allowing users to hand paint the image, offering greater nuance and control. The process begins with setting up the document at 1280 by 720 pixels with a resolution of 72 pixels per inch, then renaming the initial layer to "base" and creating a copy named "smart blur
Photoshop Watercolor Photo Effect Tutorial
In this comprehensive tutorial by Arunz Creations, you'll discover how to transform a portrait into a beautiful watercolor painting using Photoshop. The process begins by organizing your layers into a group and temporarily hiding it. Next, you'll select specific colors from the portrait using the Color Range tool to create a precise selection. After applying the selection as a mask on the group and inverting it, you'll create a new empty layer beneath the group and fill it with white to serve a
Create Raindrops on a Window in Photoshop
In this Photoshop tutorial by Howard Pinsky, you'll explore how to create realistic raindrops on a window. The process uses a custom brush, Layer Styles, and Filters, ensuring you have all the tools needed for a convincing final look. You will learn how to adjust these elements to create raindrops of various sizes and shapes, making them appear as natural as possible. Additionally, the tutorial covers how to design a 'frosted' window effect. This includes simulating moisture that has been parti

Get tutorials & freebies delivered to you.

Subscribe to the Photoshop Roadmap newsletter, a weekly roundup of new tutorials, insights and quality downloads, trusted by 6500+ readers.

You might also like

How to Create a Can Mockup in Photoshop Using Smart Objects and Masks

Professional can mockups transform flat designs into realistic product presentations that clients can instantly visualize. This technique combines precise measurement, smart object workflow, and blending modes to wrap your graphics seamlessly around curved surfaces. The process creates reusable templates that automatically apply proper perspective and lighting effects to any design...

Cutting Out Complex AI Images Using Channel Masking in Photoshop

AI-generated images often contain intricate details that challenge standard background removal tools. When automatic selection methods fail to capture complex edges and fine details, manual techniques become essential. This technique demonstrates how to use channel masking to create precise selections that preserve every detail of your AI artwork. Watch the...

How to Place Images Inside Text Using Clipping Masks in Photoshop

Text filled with vibrant images creates striking visual impact that transforms ordinary typography into compelling design elements. This technique uses Photoshop's clipping mask feature to seamlessly insert any photograph into letter shapes. The method works for posters, social media graphics, and branding projects where bold visual statements matter...

How to Use Photoshop 2026's New AI Upscale, Sharpen, and Denoise Filters

Photoshop 2026 introduces three powerful AI filters that transform low-quality images into crisp, professional results. These tools tackle common photo problems: pixelated enlargements, soft details, and grain from low-light conditions. Each filter uses advanced AI models to enhance different aspects of your images, with options ranging from standard to premium...

How to Watch YouTube Videos Inside Photoshop with Free Plugin

Following Photoshop tutorials often means constant tab switching between YouTube and your workspace. This free plugin eliminates that frustration by embedding YouTube videos directly inside Photoshop panels. The PiXerfect Player keeps your tutorials visible while you work, maintaining focus and workflow momentum without missing crucial steps. Watch the Tutorial Key...

How to Create Collage Text Effects in Photoshop

Collage text transforms simple typography into visually striking artwork by combining wrapped paper textures, strategic warping, and careful masking techniques. This creative approach gives letters dimension and character, perfect for artistic projects and unique design elements. The technique involves layering textured materials within letter shapes, then using Photoshop's...

You’ve successfully subscribed to Photoshop Roadmap
Welcome back! You’ve successfully signed in.
Great! You’ve successfully signed up.
Success! Your email is updated.
Your link has expired
Success! Check your email for magic link to sign-in.