Create Realistic Wet Glass Effect in Photoshop

Create Realistic Wet Glass Effect in Photoshop

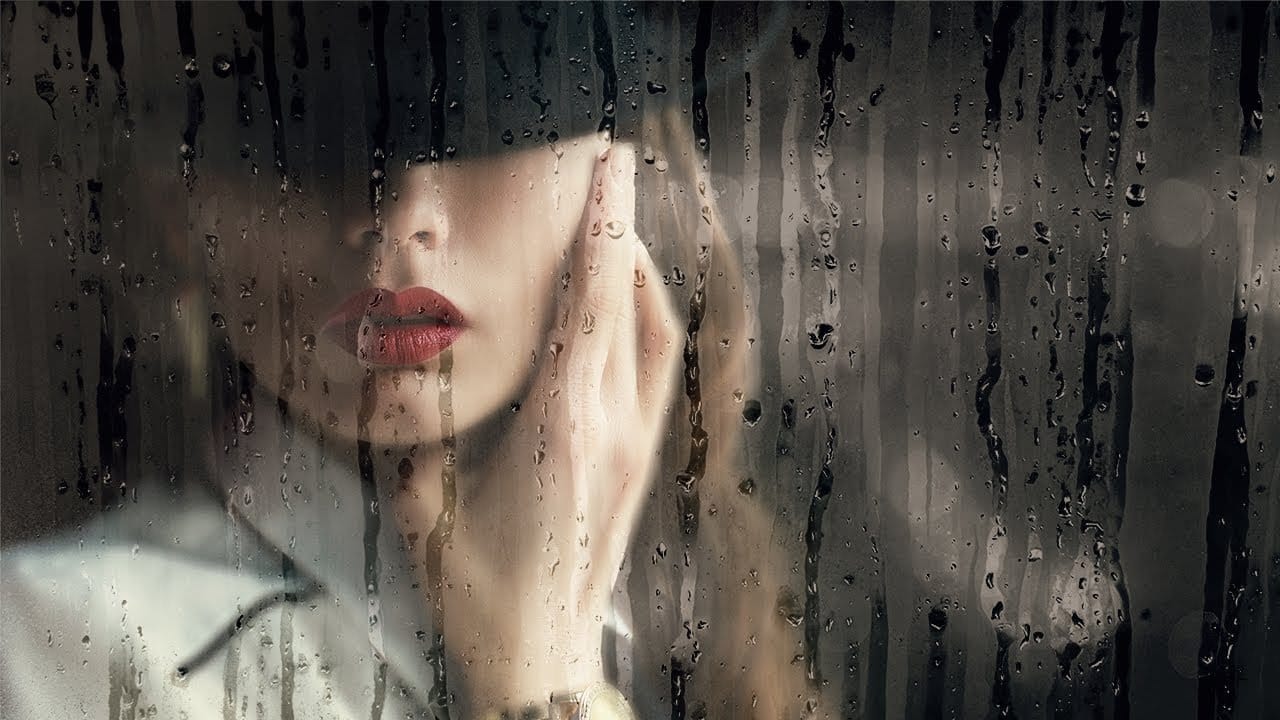
Achieving a realistic wet glass effect in Photoshop can transform an ordinary image into a captivating scene, adding depth and a sense of atmosphere. This technique is especially useful for creative compositions, weather simulations, or product visualization. By understanding how light interacts with glass and water, you can craft truly convincing visuals.

This tutorial provides a comprehensive approach, guiding you through the process of layering textures and applying precise blending methods. It ensures you can replicate the intricate details of a moist window, bringing a new level of artistry to your digital work.

Watch the Video

Video by PiXimperfect. Any links or downloads mentioned by the creator are available only on YouTube

Understanding Transparency and Reflection in Digital Art

Simulating transparent and reflective surfaces like glass in digital art involves more than simply reducing opacity. Real-world glass interacts with its environment in complex ways, displaying both reflections from external light sources and refractions of objects seen through it. Adding a wet or frosted element further complicates this interaction, as water droplets or condensation scatter light and introduce subtle blurs.

Effective digital glass effects rely on capturing these nuances. Artists often employ multiple texture layers to represent various aspects, such as:

  • Surface reflections
  • Subtle imperfections or grunge
  • Condensation or water droplets

These layers are then carefully blended using specific blend modes and masking techniques to mimic how light and transparency behave in real life, making the illusion convincing to the viewer.

Practical Tips for Creating Wet Glass Effects

  • Use screen blend mode for reflections to simulate how bright light bounces off glass, enhancing the illuminated areas.
  • Apply Gaussian blur to textures used for coloring to isolate color information, ensuring a consistent mood without adding unwanted detail.
  • Employ Iris Blur to selectively blur backgrounds, creating a shallow depth of field that separates the subject from the glass.
  • Utilize the Color Range selection tool to isolate specific tones, such as shadows, for precise masking of blur or color effects.
  • Leverage adjustment layers like Curves to control brightness and contrast non-destructively, allowing for easy refinements to the overall lighting and mood.

Learn more about creating diverse glass and water effects, from transparent text to realistic raindrops, with these insightful guides.

Create a beautiful wet glass effect with raindrops in Photoshop
In this tutorial by PiXimperfect, we will use the power of observation to achieve any effect we desire. We'll start off by applying a different kind of blur that looks much more natural than Gaussian Blur. Then, we will limit the blur only to certain areas to go with the texture by using Color Range. Next, using blend modes, we will put up another layer of texture on top of our subject to add depth and authenticity to the effect and the overall mood of the image. In the end, the power of Adjust
Shiny Glass Text Effect in Photoshop
In this tutorial by Learning Screen, you'll learn how to create a shiny glass text effect using the Layer Styles option in Photoshop. The step-by-step guide will show you how to apply this glass effect to any layer or text object, enhancing its appearance with a sleek, transparent look. You'll also learn how to save the effect as a layer style preset, allowing you to quickly and easily apply the glass effect to other layers or text in your projects. This tutorial is perfect for adding a modern
Create waterdrops in Photoshop
A simple gradient applied from the upper left corner to the lower right corner forms the foundation of convincing digital water drops. This technique transforms a basic circular selection into droplets that appear to hold actual depth and weight on any surface. The effect relies on precise layer style combinations and strategic highlight placement rather than complex filters or specialized brushes. Watch the Video The Science Behind Digital Water Drop Effects Water drops appear three-dimens
Create Raindrops on a Window in Photoshop
In this Photoshop tutorial by Howard Pinsky, you'll explore how to create realistic raindrops on a window. The process uses a custom brush, Layer Styles, and Filters, ensuring you have all the tools needed for a convincing final look. You will learn how to adjust these elements to create raindrops of various sizes and shapes, making them appear as natural as possible. Additionally, the tutorial covers how to design a 'frosted' window effect. This includes simulating moisture that has been parti

Get tutorials & freebies delivered to you.

Subscribe to the Photoshop Roadmap newsletter, a weekly roundup of new tutorials, insights and quality downloads, trusted by 6500+ readers.

You might also like

How to Create a Steel Engraving Effect from Photos in Photoshop

Steel engravings were a traditional printmaking technique that created intricate illustrations with fine lines and rich tonal variation. This effect transforms ordinary photographs into artwork that mimics the detailed crosshatching and precise lines characteristic of vintage engravings found in old books and currency. The technique combines strategic filter combinations with...

How to Customize Your Photoshop Workspace for Better Workflow

A cluttered workspace can overwhelm new users and slow down experienced editors. The default interface includes dozens of panels and tools, many of which you may rarely use, while the ones you need most remain scattered across the screen. This tutorial shows you how to reorganize panels, position toolbars, and...

Creating a Fantasy Photo Composite with Grapes as Balloons in Photoshop

Transform ordinary photographs into whimsical fantasy scenes using creative vision and modern compositing tools. This detailed walkthrough demonstrates how to build a surreal image of a young girl floating through the sky, held aloft by grapes reimagined as colorful balloons. The project combines just two main photos—a portrait and...

How to Use Photoshop's Auto Distraction Removal Tool

Removing unwanted elements from photos used to require hours of careful work with clone stamps and healing brushes. The new General Distractions feature in Photoshop's Remove Tool changes this completely by automatically detecting and eliminating distractions across 26 different categories with a single click. This AI-powered upgrade can...

How to Apply Gradients to Any Object Using Hue/Saturation and Layer Masks

Changing colors and adding gradients to clothing or objects in photos requires precise selection techniques to avoid affecting surrounding elements like skin tones. This method combines hue/saturation adjustment layers with layer masks to create stunning gradient effects while maintaining full control over which parts of your image are affected....

How to Use Layer Filtering to Organize Complex Projects in Photoshop

When working with dozens of layers in complex composites or designs, finding specific elements becomes a time-consuming challenge. The layer filtering system in the Layers panel offers powerful tools to instantly isolate different types of content, making organization and editing far more efficient. These filtering options help you quickly group...

You’ve successfully subscribed to Photoshop Roadmap
Welcome back! You’ve successfully signed in.
Great! You’ve successfully signed up.
Success! Your email is updated.
Your link has expired
Success! Check your email for magic link to sign-in.