How to Create Realistic, Fog and Mist in Photoshop

How to Create Realistic, Fog and Mist in Photoshop

This video explores how to add realistic atmospheric effects to your photographs. Understanding the nuances of light and haze can dramatically transform a scene, lending it a sense of depth and mystery.

Viewers will learn practical techniques for simulating fog and mist, focusing on how these elements interact with foreground and background objects. The tutorial demonstrates how to achieve a natural, ethereal look, enhancing the mood of any landscape.

Learn to Create Realistic Fog and Mist

Video by Blue Lightning. Any links or downloads mentioned by the creator are available only on YouTube

The Art of Atmospheric Perspective

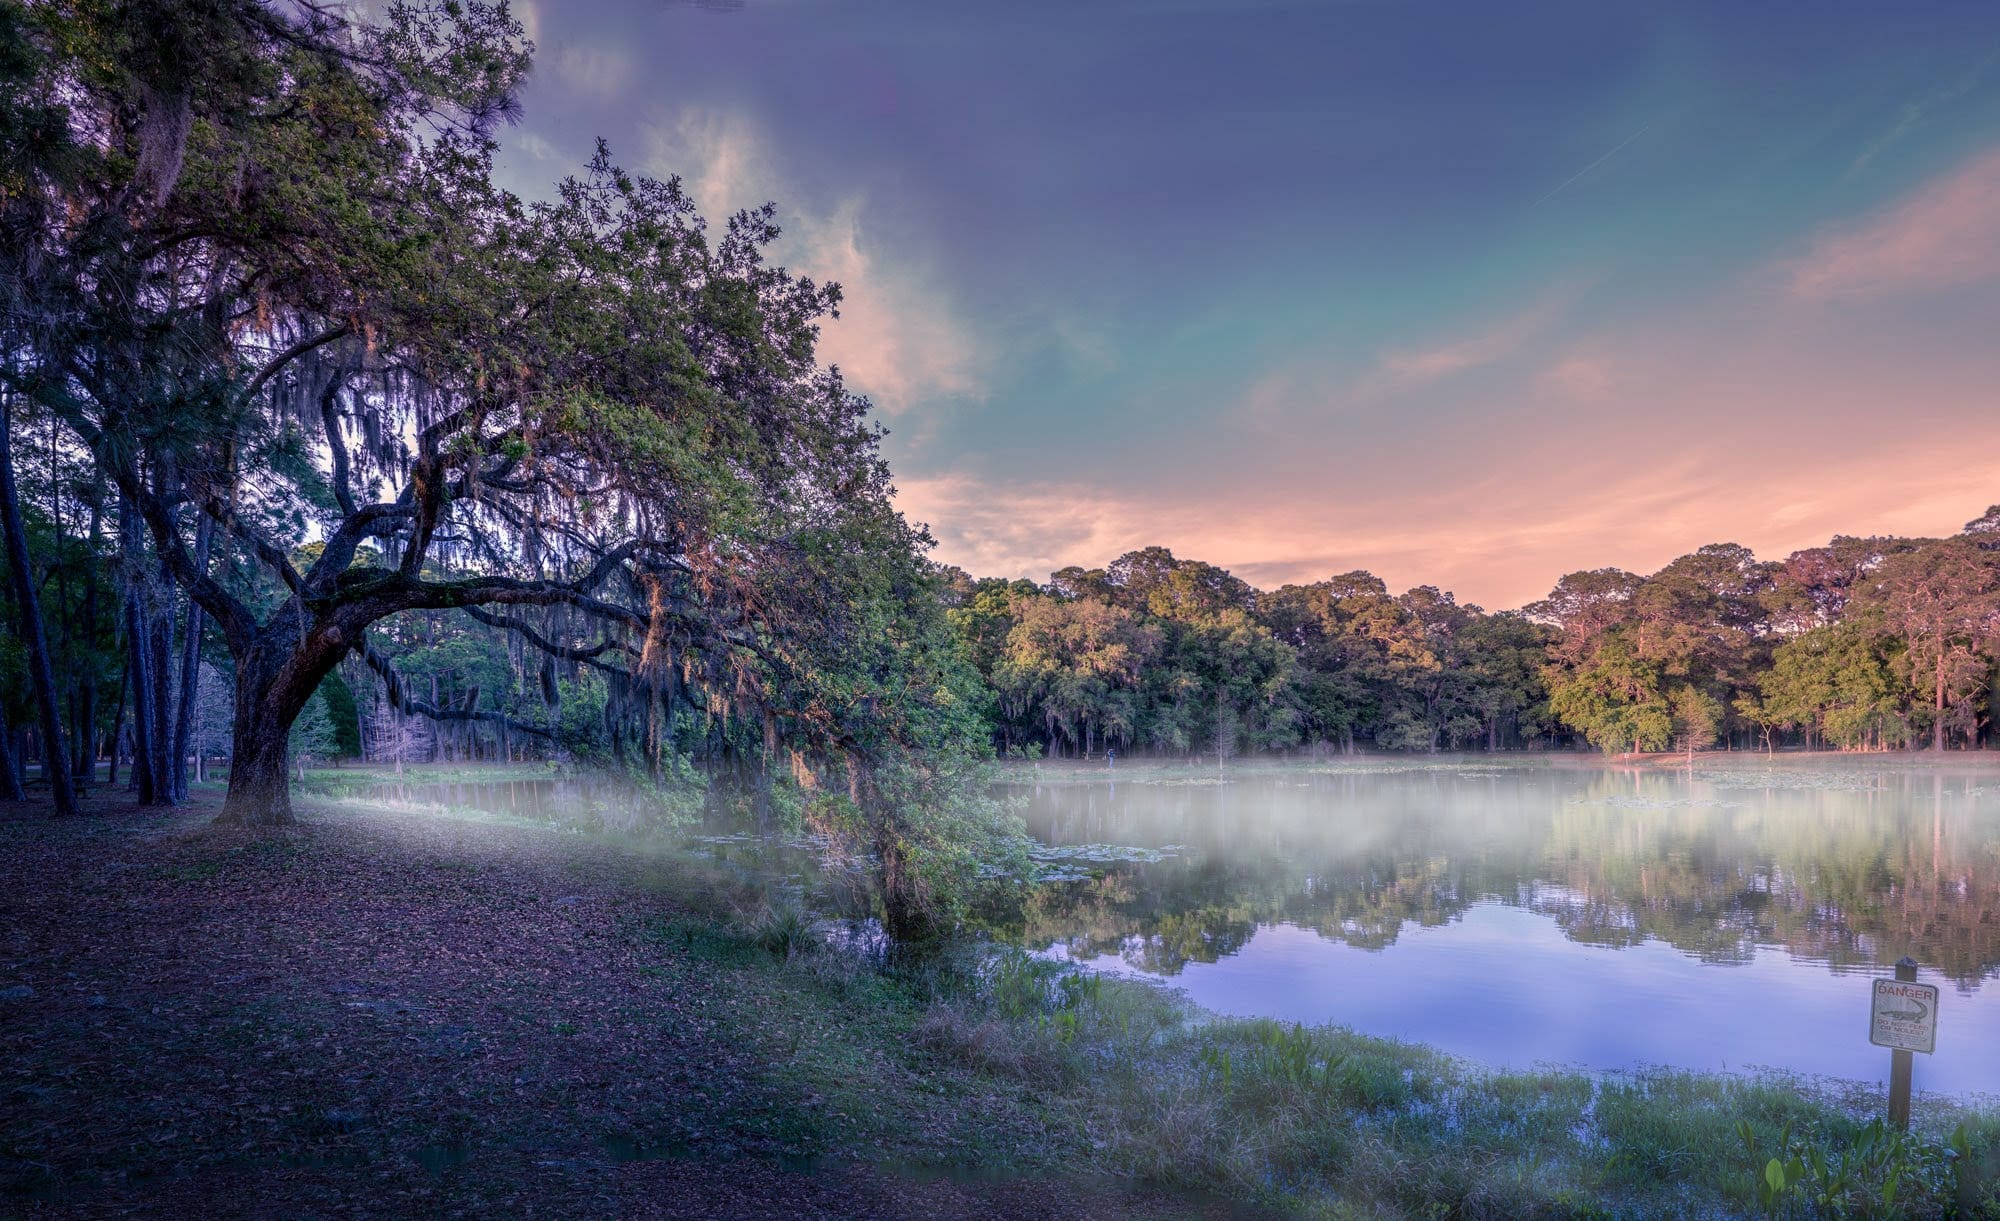
Atmospheric perspective is a crucial artistic technique that simulates depth by depicting distant objects as lighter, less saturated, and bluer due to the scattering of light by air particles. In nature, this effect is often intensified by phenomena like fog and mist, which selectively obscure parts of a scene.

When integrating fog or mist into an image, it is essential to consider their natural behavior. Fog typically reduces contrast and color saturation uniformly across a scene, while mist often clings closer to the ground in distinct patches. Replicating these characteristics realistically ensures the artificial elements blend seamlessly with the original photograph. This thoughtful approach helps maintain the visual integrity of the image while enhancing its mood.

Practical Tips for Adding Fog and Mist

  • Desaturate and lighten the image using a Hue/Saturation adjustment layer, then apply a linear gradient from black to white to control the effect's intensity.
  • Restore brightness and color to foreground objects using a selection tool and a soft brush on the adjustment layer's mask, ensuring closer elements appear less enveloped by fog.
  • Create mist by rendering clouds on a new layer, setting the blend mode to Lighten, and transforming its scale to be wide and shallow.
  • Refine mist by duplicating the cloud layer, adjusting its scale, and using a soft eraser to shape its top edge and reduce opacity for a more natural appearance.

More Tutorials about Atmospheric Effects

Explore additional resources to further enhance your skills in creating captivating atmospheric effects and digital art.

Add fog and mist to a photo in Photoshop
This tutorial by Serge Ramelli will show you how to add fog and mist to your landscape photos using Photoshop. It's a simple process that can be applied to a wide range of images. The steps are straightforward and easy to follow. You'll learn how to create a layer of fog or mist and adjust its opacity and blending mode to achieve the desired effect. This technique can help add depth and atmosphere to your photos, transforming a flat landscape into a more moody and evocative scene. Whether you'
How to Add and Remove Fog in Photoshop
In this Photoshop tutorial, the author, Aaron Nace from Phlearn, teaches how to add and remove fog in your photos. The process is straightforward and can be accomplished in a few easy steps. The tutorial guides the user through the necessary techniques to achieve the desired effect. By following the instructions provided, one can seamlessly incorporate or eliminate fog from their images, enhancing the overall visual impact. The tutorial offers a practical and accessible approach, making it sui
How to Create a Realistic Cloud Text Effect in Photoshop
Every new release of Photoshop includes some kind of tool that automates something we are used to doing manually. Many times it makes tedious tasks go by faster without having much effect on the final outcome of our designs. Sometimes, however, taking the time to do something by hand can yield more interesting results. This tutorial by Design Panoply will show you how to use some very basic skills, along with high quality Photoshop brushes, to achieve an ethereal cloud text effect. Watch tuto
Create a text on a foggy rainy window in Photoshop
In this Photoshop tutorial by Marty Geller from Blue Lightning TV, you'll learn how to create the look of a handwritten message on a foggy, rainy window pane. The tutorial guides you through the process of simulating a realistic foggy glass effect and adding a text layer that appears as if it has been written by hand on the misted surface. This step-by-step guide covers various techniques and tools in Photoshop to achieve this atmospheric and evocative effect, perfect for adding a touch of dram

Get tutorials & freebies delivered to you.

Subscribe to the Photoshop Roadmap newsletter, a weekly roundup of new tutorials, insights and quality downloads, trusted by 6500+ readers.

You might also like

How to Enhance Skin Tones Using Gradients in Photoshop

Skin tones often appear washed out or lifeless in photographs due to challenging lighting conditions or camera settings. This gradient-based technique brings vibrancy back to portraits while creating natural-looking dimensional highlights that draw the viewer's eye to key facial features. The method uses Color Range selections combined with...

7 Signs You're a Photoshop Pro - Skill Assessment Guide

Professional Photoshop mastery isn't about memorizing every menu or filter. It's about developing efficient workflows, understanding core concepts, and building muscle memory for essential techniques. Real pros focus on the right tools for their specific needs rather than trying to learn everything. This comprehensive assessment covers...

How to Use Generative Upscale with Multiple AI Models in Photoshop

Pixelated vintage photos and low-resolution images no longer need to stay small. Photoshop's Generative Upscale feature now offers multiple AI models to enlarge images up to 4x their original size while adding remarkable detail and clarity. This new feature includes three distinct AI models—Adobe's Firefly...

Create a Pointillism Effect in Photoshop

Pointillism, the late 19th-century painting technique that uses small dots of color to form images, creates a distinctive artistic look where colors blend optically when viewed from a distance. This digital recreation technique transforms ordinary photographs into artwork that mimics the style of masters like Paul Signac. The process combines...

How to Convert WebP to JPEG in Bulk Using Image Processor

Converting large folders of WebP images to JPEG format can be time-consuming when done manually. Image Processor provides an efficient solution for batch conversion, automatically handling multiple files while maintaining quality settings and organization. This method works with any image format conversion and creates organized output folders, making it ideal...

How to Use Generative Credits in Adobe Creative Cloud: Standard vs Premium Features

Adobe's generative AI features transform how creatives work, but understanding which tools consume credits can save you time and budget frustration. The credit system divides features into standard and premium tiers, with different consumption rates based on processing complexity. Knowing the difference between assistive AI tools that cost...

You’ve successfully subscribed to Photoshop Roadmap
Welcome back! You’ve successfully signed in.
Great! You’ve successfully signed up.
Success! Your email is updated.
Your link has expired
Success! Check your email for magic link to sign-in.