

I’m quite sure that many of you had the chance to try those wonderful Triazzle™ puzzles that are being sold at toys stores all over the country. Triazzle™ puzzles were invented by Dan Gilbert, a Graphic Artist, Product Designer and founder of the Dan Gilbert Art Group, after a request from the National Aquarium in Baltimore to create something special for a new exhibit. That original puzzle was never released, but some years later the DaMert Company expressed their interest in that original brain teaser and shortly they began a collaborative work to produce one of the best selling products of its kind for many years.
Triazzle™ puzzles are not only a great game and brain teaser, but they are also wonderful and enticing works of art. Dan Gilbert has managed to create so beautifully designed illustrations and scenes that you can spend a lot of time watching the full collection in search for design ideas or simply for a visual enjoyment.
Although you can purchase these puzzles at many toy stores, you may want to create your own puzzles with your kids’ favorite characters or with your own creations. This tutorial will guide you through the steps needed to create your own Triazzle™-like puzzle. It also an excuse to learn some nice illustration tips.

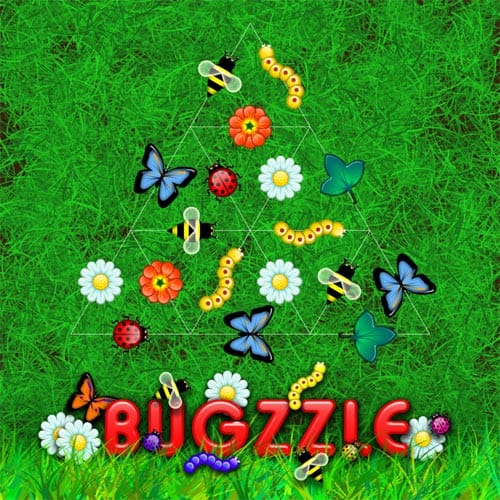
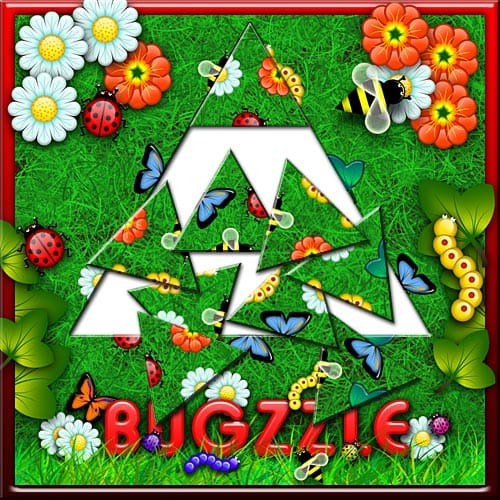
The image above shows the final puzzle. If you don’t want to go over the instructions, you can download the finished puzzle (at the end of this article), print it, glue it to a cardboard, cut it and play with it. If not, then follow the instructions of this article.
Keep in mind that each effect could be a single tutorial itself, so I will assume that you have an intermediate to advanced Photoshop experience. If you are a beginner, you will also find useful information about special effects and in most cases I will point you to external resources that can teach you that effect in depth.
1 .: Choosing the theme and drawing the board

Step1: Click image to enlarge

Step2: Click image to enlarge
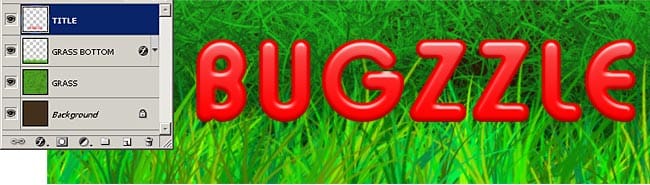
This puzzle will be all about bugs and flowers in the grass. Just for fun I decided to add a title to it and came up with this amazingly clever one: BUGZZLE.
We will work on a 1000×1000 pixels image. All the references will be according that size. You can choose a higher or lower resolution image and adjust settings accordingly.
Step 1:
Create a 1000×1000 image and fill it with a brown color #34210d.
Create a new layer and choose
– Foreground color: #236a16
– Background color: #1ec51b
and start painting the grass on a new layer using the the brush tip shown on the right image with a large Angle Jitter value. It is a good idea to experiment with different brushes settings and coverages to obtain a good looking texture.
For beginners: This technique is clearly outlined in the great tutorial creating a grass text effect from PhotoshopTutorial.net.
Step 2:
Create a new layer and name it GRASS BOTTOM.
Hide the GRASS layer.
We will paint more grass on the GRASS BOTTOM layer, but now it will be a vertical grass located at the bottom of the image.
Select similar foreground and background green colors as in the previous step.
Choose the brush shape shown in the image on the right and, using the default brush settings, start to paint the grass horizontally. The default settings of this brush include scattering, angle jitter and other transformation settings that will give a more realistic look to the grass. This grass will be used as a background support for the game title.
For beginners: Follow the instructions of this grass simulation tutorial Grass and Sky effect from HeathRowe.
When finished, add a Drop Shadow layer style using the settings in the image at the right. Remember that these settings are chosen for a 1000×1000 image. Anyway, no matter what settings you choose, the point is to add a drop shadow that separates the vertical grass from the background. You can tweak these settings later to achieve a better result.
Now show the GRASS layer and check if you are ok with the results. Perhaps you may want to modify the Drop Shadow layer style, or you may want to expose more earth in the grass background. But it is important that the texture of the background is applied evenly and doesn’t show recognizable areas that may help solve the puzzle. Remeber that this is a puzzle, and it is meant to be a challenge.
Again, as in the previous step, try different settings or colors to come up with different textures.
2 .: Ladybugs, butterflies, flowers, and other bits and pieces for the puzzle graphic design.
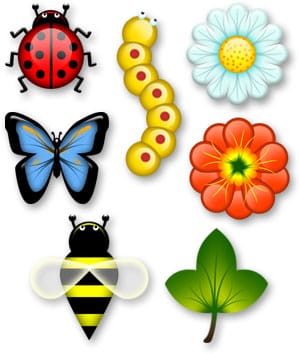
icons: Click image to download (1.25mb .zip file)
Trying to explain how to create the little bugs and flowers would turn this tutorial into a book. In fact, you can use whatever you want for the sake of the puzzle playability.
You can use letters from a nice typeface family, or even a nice collection of aqua icons for windows or mac.
You can find some icons and clipart collections here for personal (non commercial use).
Don’t panic, you can download the already made high resolution images used in this tutorial. Yes, with layers and all. Just click on the image on the right.
All these icons are my creation, except for the Ladybug and Bee icons which were created following (with slight modifications) two great tutorials from MyPhotoshop.com. If you want detailed instruction to create these glossy shapes, read the Ladybug and Bee icons tutorials. They also have other great tutorials at their tutorials section.
If you are a more advanced user, read on, because I will now explain the very basics of a glossy shape.
3 .: Creating a glossy shape effect
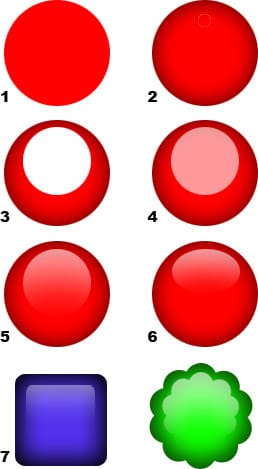
The image to the right shows the metamorphosis of a flat red circle into a glossy 3D shape with a certain aqua appearance.
Step 1: Start with a colored circle (red in this case).
Step 2: Add a black Inner Shadow or Inner Glow layer style to give depth to the shape.
Step 3: Draw a smaller white circle over the shape and move it up without touching the top border.
Step 4: Set the opacity of the circle to 60% to reveal the underlaying color and texture.
Step 5: Erase with a large and smooth brush tip the lower part of the circle and that’s all. The resulting shape looks like a half sphere.
Step 6: If you want to give the appearance of a pin or round button, you will have to stretch or scale vertically the transparent white reflection. This will “flatten” the shape.
Step 7: This effect can be applied to different simple shapes. Increasing the darkness of the inner shadow, gives the effect a more glassy look.
This effect was used with all the bugs and flowers except for the green leaf (no glossy effect there) and the butterfly where I used an Inner Bevel layer style due to the complexity of the shape.
This was only a basic, but quite effective, approach to glossy and aqua shapes effects.
4 .: Creating a glossy text effect for the puzzle title
A thick rounded font was the obvious choice for this title. For this example, I will use Alba Matter Font, but of course you can use whatever you want.
For those who read the Ladybug and Bee tutorials mentioned above, you will notice that it would be difficult to use the same technique with a title. In this case the Layer Styles come in handy. If you want to skip this part, just download this Red Glossy layer style.
Step 1: Type the title of the game, go to Layer Styles and select Gradient Overlay.
Click on a gradient and the Gradient Editor will pop up. Click on the New Gradient button and build a gradient like the one on the right image. First color: #FF0000. Second color: #F77979. Move the Color Midpoint (the little rhomb between the two color swatches) near the pink color. Give the new gradient a name and close the Gradient Editor. Now, on the Gradient Overlay window, select linear gradient and 90 degrees rotation. The text should look like the image on the right, with a slight lightness increase on the top.
Step 2: Still in the Layer Styles window, select Stroke. Choose Color: #FF0000 and Position: Inside. This will “cut” the gradient’s lighter color to simulate a glossy reflection. Don’t close the Layer Style window yet.
Step 3: Now select Bevel and Emboss and leave the default settings. Just only uncheck the Use Global Light. Set the Angle: 90 degrees and Altitude 73 degrees. If you are not happy with the results, adjust the Size and Depth or Shading (Angle and Altitude) settings. Many people are not aware that setting the Altitude to about 70 degrees gives a glossy look to the shape. Using less than that, the shape starts to look more rough. Don’t go near 90 degrees or you will get odd results.
5 .: Creating softer shadows
There is so much detail in the grass background that the also very detailed shapes won’t visually stand up as they should.
The default drop shadow settings are very hard and are not very useful in this case. The following image shows the difference in using softer shadows and how to create them.
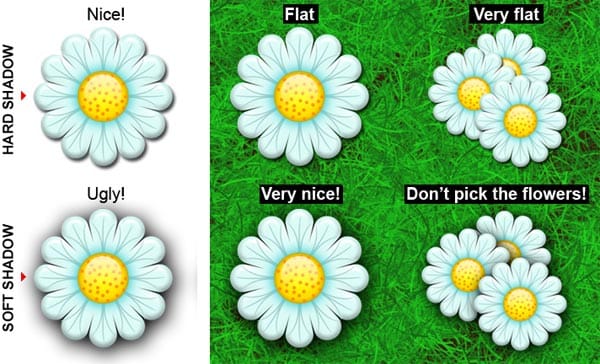
As you see, softer shadows look terrible over white background. Or at least in this example. But when you add a very detailed background the difference is noticeable because the shadow spreads all arround the shape and it helps to raise it.
Creating these shadows is very simple. You have to add a Drop Shadow layer style as usual, and play with the Distance, Spread and Size settings. You should set the Distance greater than zero just to displace the shadow to one side, but the distance should be lower than the size of the shadow. This way, the shadow will also show a little on the opposite side of the shape.
Take a look at the soft shadowed flower over the white background. There you will see that the shadow is showing all around the flower, but it is slightly displaced right and down.
6 .: Building the puzzle board
The fun part begins. We learned how to create a grass background, how to create glossy shapes and a glossy title. Now it is time to place everything in the board, including the triangle pieces layout.
Step 1: Create a new layer above the GRASS BOTTOM layer and paste the title you created, or create it now on that layer using the technique outlined previously.
IMPORTANT NOTICE : When working with Layer Styles you have to be very careful because Layer Styles window has the Use Global Light setting active by default.This setting links the lighting angle of all Layer Styles in the document, so each time you change one lighting angle, you will be changing the whole document lighting angles. You will have to uncheck that setting each time you add a new Layer Style to that document.
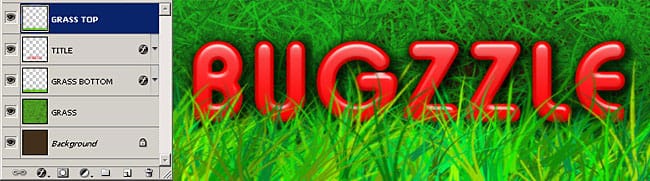
Step 2: Duplicate the GRASS BOTTOM layer, turn off (or delete) the Drop Shadow Layer Style and place it above the TITLE layer.
Then, stretch the new grass layer vertically so it doesn’t cover too much of the title. As a result of this vertical-only scaling, the new grass layer looks different than the original one and so it adds more chaos to the grass texture.
After that, the title will look like as it is standing in the grass. Also, add a soft Drop Shadow Layer Style to the title (using the technique outlined previously) in order to make it look more realistic.

Step 3: Not much to say here, it’s up to you. Copy the glossy bugs and flowers and start placing them all over the title. Remember to add some soft shadows. Try changing the colors of the shapes using The Hue/Saturation command and also place the bugs and flowers in front or at the back of the text and grass.
Notice the yellow ladybug walking over the L but behind the grass, or the grass covered white flowers. These kind of little details can make the difference.
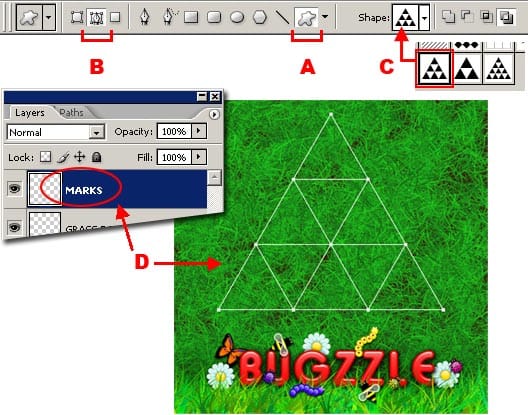
Step 4: Now we are going to draw the puzzle pieces. The diagram consists in several equilateral triangles. They are easy to draw with Photoshop, but to speed things up, you can download these equilateral triangles custom shapes. With these shapes you will be able to draw the board in three sizes: small, medium and large.
A) Select the Custom Shape Tool
B) Select the Path option to draw with paths.
C) Load the equilateral triangles custom shapes and select the Triangle medium diagram.
D) Create a new empty layer and with the Custom Shape Tool selected draw the diagram (as shown above) while pressing the SHIFT key.
WARNING: Remeber to press the SHIFT key while drawing the diagram. If not, the resulting triangles will not be equilateral triangles, thus, the puzzle will never be correct.
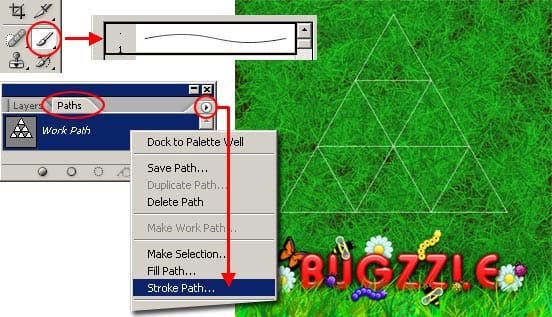
Step 5:
Now we are going to stroke the recently drawn path.
– Select WHITE as the Foreground color.
– Select the Paintbrush tool and select a brush tip of 1 pixel.
– Then go to the Paths palette and select Stroke Path… A small window will show up.
– Select the Paintbrush tool and click OK.
– All the triangle puzzle pieces will show up drawn with white thin stroke on the layer named MARKS
After that, go to the Paths palette and click outside the path to deselct it.
7 .: Building the puzzle pieces.
The following step is the most difficult part. You will have to place the bugs and flowers all over the board but with a special distribution.
To be honest, you can place them anywhere you want. The puzzle will work, anyway. But to make it harder, you have to “puzzle” the builder. If you leave many clues, like a background with recognizable areas, or unique shape placements, the builder will recognize them and start from that point.
Sadly, I couldn’t find any information about the logic of this puzzle. Since it is beyond the scope of this tutorial to make that kind of analysis, I decided to copy the distribution and position of the pieces from a downloadable original Triazzle™ pdf file (Mac .sit file | Windows .zip file) by Dan Gilbert, from the Triazzle downloads page (more downloadable triazzles there!).
Lets check the following examples:
Example 1:
The pieces are placed in a recognizable way. There is only a blue worm, both ladybugs have noticeable different sizes, and the rest of the shapes are unique. For a little kid this may be somewhat difficult, but for an older one, this puzzle is far from a challenge.
Example 2:
This layout is much better. The way the shapes are placed will confuse the builder when he/she is presented with a group of scrambled pieces All shapes are positioned and cut in similar ways. As mentioned before, this placement was copied from a downloadable original triazzle by replacing the original shapes with the ones from this tutorial.
Download the pdf file (Mac .sit file | Windows .zip file) and check how the replacement was made. The little bear was replaced with the white flower, the duck with the bee, the choo-choo train with the leaf, and so on.
The beauty of this puzzle is that the builder doesn’t know where to start when looking at the scrambled pieces because of the lack of a recognizable unique figure.
To place the bugs and flowers the same way as the previous example (#2), you will have to rotate them in increments of 30 degrees. The internal angles of an equilateral triangle are 60 degrees each. So, if you have your shape in vertical position, you can rotate them using the Free Transform Tool while pressing the SHIFT key. The SHIFT key will constrain the rotation angle in increments of 15 degrees, so it will be easy to get the correct rotation.
After a little (er, maybe a lot) of work you should end up something similar to the image above.
8 .: Adding final touches to the board.
At this point we are almost done. I will add a nice glossy frame using Layer Styles.
To build the frame, just add a new empty layer, go to SELECT > ALL to select the whole layer. Go to EDIT > STROKE and apply a red stroke of 30 pixels or so (remember that we are working on a high resolution version).
Now go to Layer Styles and choose Gradient Overlay to apply a vertical gradient from red to dark red. After that, choos Bevel and Emboss and apply a glossy style just it was explained prevously: Use a 90 degrees Angle and a 73 degrees Altitude.
In fact, is your frame. You can do whatever you want. Just Create a nice one.
Te last step would be to add some decoration to the board. Lets place some leaves, flowers and bugs in separate groups.
Notice how the upper right bee has a more displaced shadow, this increases the separation between the bee and the flower. Another little nice detail is to place some flowers and leaves on a layer above the frame’s layer. This helps to break the frame enclosing. On the other side, the little bugs and flowers that were placed over the puzzle pieces, don’t have any drop shadow. I did that intentionally, just because it looked better.
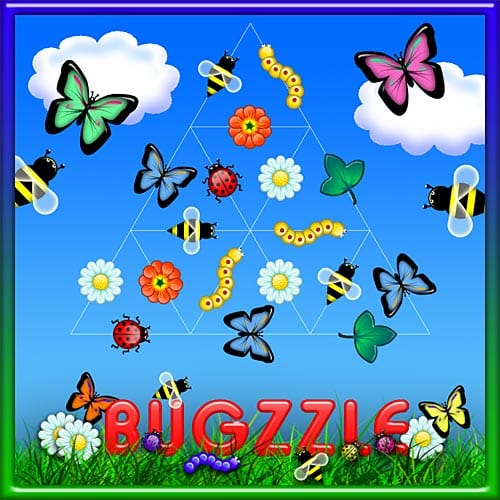
Another easier way of decorating the background could be replacing the grass background with a light blue to blue gradient, draw a couple of clouds witht the freeform shape tool, and put to fly a couple of bees and butterflies. Don’t use shadows in this case, they are flying!
Just for fun, the image below shows the puzzle the way it would look with the pieces scrambled all over the board.
9 .: Download the printable version.
This tutorial was probably very difficult to follow, but despite of that, there were some nice tips and tricks that you could use in other opportunities. Remember that we used a 1000×1000 image in this case. With that size, at a 120 dpi resolution, you could print this image on an A4 or Letter size sheet.
If you want to create a larger image you will have to pay attention to the Layer Styles settings or to the brush tip size (in the case of the grass). Fortunately, the bugs and flowers were created in a large size. And of course, the trianglular puzzle diagram is a Custom Shape, so it can be used at any image size.
Download the Grass Bugzzle puzzle and the Sky Bugzzle puzzle high resolution images, print them, glue them on a thick cardboard, cut the triangles out, and start playing!


