Cartoon 3D Text Effect in Photoshop

Cartoon 3D Text Effect in Photoshop

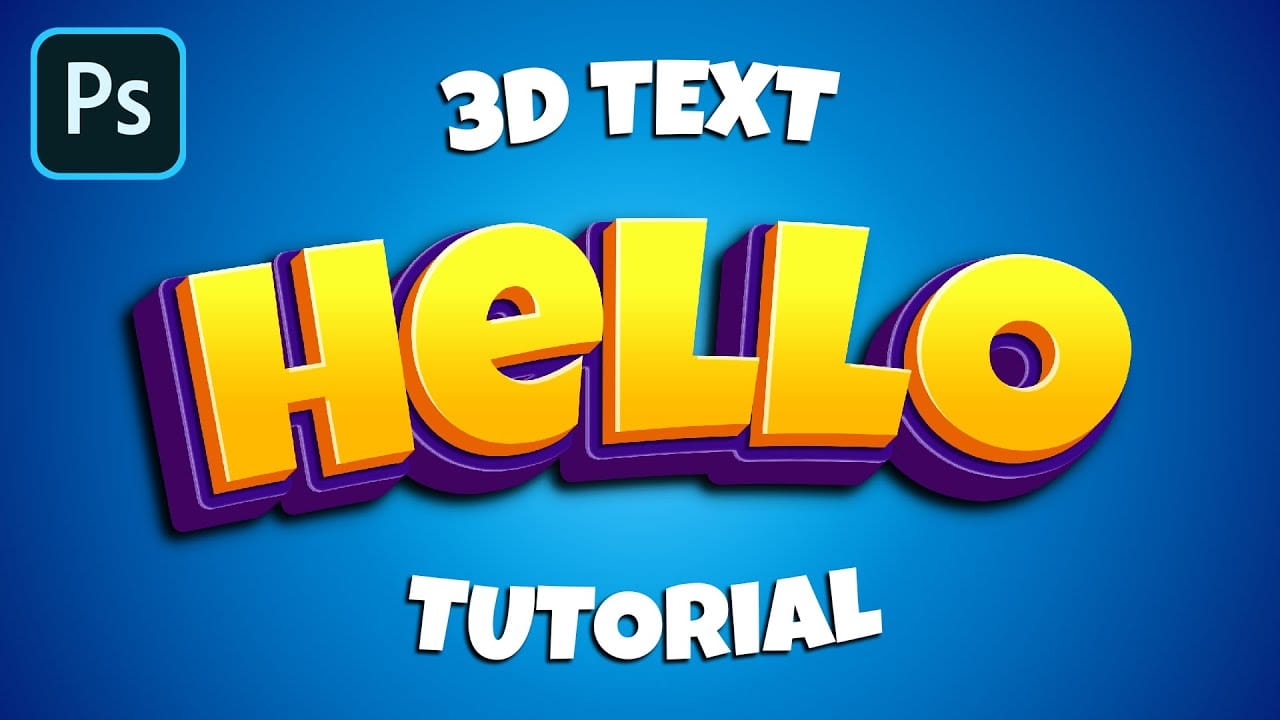
Creating a vibrant cartoon 3D text effect in Photoshop allows you to add playful depth and visual flair to your designs. This style is perfect for headlines, logos, or any graphic element that needs to pop with a fun, dynamic energy.

This tutorial guides you through the process, from initial text styling and color application to building multi-layered extrusions and intricate shadow details. You'll learn how to transform flat text into a compelling 3D graphic using a combination of blending options and precise transformations.

Watch the Video

Video by PhoTuts. Any links or downloads mentioned by the creator are available only on YouTube

Exploring the Visuals of Cartoon 3D Text in Photoshop

Achieving a compelling cartoon 3D text effect in Photoshop involves more than just adding depth; it requires a thoughtful approach to color, layering, and texture. The distinct look of this style often relies on bold hues and clear outlines that mimic traditional animation, making the text feel alive and almost tangible. Effective use of gradients can also enhance the rounded, volumetric appearance, moving beyond a simple flat fill to suggest light and shadow interactions.

The success of these designs often lies in the strategic application of multiple layers, each contributing a slight shift in position or a change in color to build the illusion of three-dimensionality. By carefully crafting the extrusions and shadows, designers can create a sense of playful depth that draws the viewer's eye and communicates a lighthearted, energetic message.

  • Layered depth for visual impact
  • Vibrant color palettes and gradients
  • Distinct outlines for cartoon aesthetics
  • Strategic shadow placement
  • Text deformation for dynamic shapes

Practical Tips for Cartoon 3D Text Effects

  • Begin with a large document size like 3800x2000 pixels with 300 DPI for high-quality output.
  • Use a bold, rounded font such as Luckiest Guy for a strong cartoon base.
  • Apply a radial background gradient with warm, contrasting colors to make the text stand out.
  • Utilize the Warp Text feature with an Arc style to add a subtle curve and dynamism to your headline.
  • Create multiple text layers, incrementally offsetting each copy and applying different colors and strokes to build the 3D extrusion effect.
  • Employ Ctrl + Alt + Shift + T repeatedly to quickly duplicate and transform layers, forming consistent extrusions.
  • Refine the overall look by adding a distinct shadow layer with reduced opacity and a specific drop shadow effect for depth.

More Tutorials about Cartoon 3D Text Effects

Discover additional guides and articles that delve into creative text effects and graphic design techniques. These resources offer further insights and inspiration for your Photoshop projects.

Colorful Painted 3D Text Effect Tutorial in Photoshop
In this tutorial by Angelo Konofaos, you'll explore how to create a 3D-style text effect in Photoshop, alongside techniques like adding shadows, highlights, shines, and colors. Utilizing a variety of Photoshop tools such as the Mixer Brush, Pen Tool, clipping masks, and adjustment layers, the tutorial demonstrates the process of refining text to achieve a polished and dimensional look. For optimal results, Konofaos recommends using a pen tablet like the Wacom Intuos to enhance precision and fl
How to Make a Cartoon 3D Text in Photoshop
In this Photoshop tutorial by Learning Screen, you will learn how to create colorful, funny cartoon-style 3D text. The tutorial guides you through the process of using various Photoshop tools and techniques to achieve a vibrant, playful text effect that stands out. The resulting text is bold and eye-catching, perfect for playful and energetic designs. This tutorial is ideal for projects like posters, children's book covers, or any other creative work that benefits from a fun and dynamic headlin
Epic 3D Text Effects in Photoshop
In this tutorial from TextureLabs, you'll explore creating epic, superhero-style typography using the Photoshop 3D workspace. The tutorial covers basic modeling, texturing, lighting, and compositing techniques, providing a step-by-step workflow to achieve impressive intergalactic designs. Note that due to Photoshop phasing out the 3D workspace, this technique has become unstable. As a response, TextureLabs has introduced the Texturelabs 3D Machine Plugin as an alternative for achieving similar
3D Water Text Effect in Photoshop
This Photoshop tutorial by Abduzeedo guides you through the process of creating a striking and dynamic 3D water text effect. The tutorial breaks down what may seem like a complex technique into manageable steps, making it accessible for users at any skill level. You will start by using the new Repoussé feature in Photoshop, which allows for the creation of 3D text effects with ease. After establishing the text, you will incorporate stock photos to enhance the water appearance, adding depth and

Get tutorials & freebies delivered to you.

Subscribe to the Photoshop Roadmap newsletter, a weekly roundup of new tutorials, insights and quality downloads, trusted by 6500+ readers.

You might also like

Create Realistic Rim Light Effects on Portraits in Photoshop

Rim lighting transforms ordinary portraits into dramatic, professional-looking images by adding bright highlights around the edges of your subject. This technique simulates light hitting the outer contours of a person, making them stand out from their background with a natural, glowing effect. The key to convincing rim light lies in...

How to Use Photoshop's Layer Cleanup Tool to Organize Messy Projects

Complex editing projects with Generative Fill and Expand often result in dozens of unnamed layers cluttering your workspace. The new Layer Cleanup tool automates the tedious process of renaming layers and removing empty ones, transforming chaotic layer panels into organized, manageable structures. This workflow improvement saves significant time during post-production...

How to Use Curves for Composite Color Matching in Photoshop

Curves adjustments are essential for making composite elements look natural and cohesive. Understanding how curves manipulate light values and color channels gives you precise control over matching different elements to their new backgrounds. The key to successful color matching lies in analyzing the color temperature and brightness relationships between your...

How to Fix Color Fringing in Subject Cutouts Using Clipping Masks

Perfect layer masks can still produce disappointing results when color fringing appears around hair and fur edges. This common problem isn't caused by poor masking technique—it's the original background bleeding through at the edges. Clipping masks offer a powerful solution by allowing you to paint...

Create Beautiful Floral Oval Frames for Portraits in Photoshop

Transform ordinary portraits into elegant artwork with decorative floral oval frames that blend seamlessly with your subject. This technique combines traditional framing with digital floral elements, creating a painterly effect that's perfect for fine art prints and creative portraits. The process involves creating an oval cutout, adding custom...

You’ve successfully subscribed to Photoshop Roadmap
Welcome back! You’ve successfully signed in.
Great! You’ve successfully signed up.
Success! Your email is updated.
Your link has expired
Success! Check your email for magic link to sign-in.